Continuous Delivery with Containers on GCP
In this codelab, you will set up a source-to-prod continuous delivery flow for a hello world app deployed via containers, on the Google Cloud Platform. You can first watch a short video of a demo, which follows a similar setup to this codelab.
This codelab is estimated to take an hour.
Overview
The end goal is to set up an environment by which a push to a release branch in GitHub will trigger a series of orchestrated build, deploy and promotion events that employ best practices in several key areas. The sequence of events is:
- Developer promotes code by pushing to the
releasebranch in GitHub - Google Container Registry automatically builds a new release container
- Spinnaker automatically deploys it to a staging Kubernetes environment
- User validates the deployment in the staging environment
- Spinnaker promotes the container to the production Kubernetes environment
Part 0: Set up Your Environment
This codelab assumes you have git on your local workstation, a Github account, and a billing-enabled GCP project.
Install gcloud
If you don’t already have gcloud installed, install gcloud.
Enable APIs
Navigate to the Google Cloud Console and enable the following APIs:
Create a Kubernetes cluster (GKE)
- Navigate to the Google Cloud Console’s Container Engine section and click the Create a container cluster button.
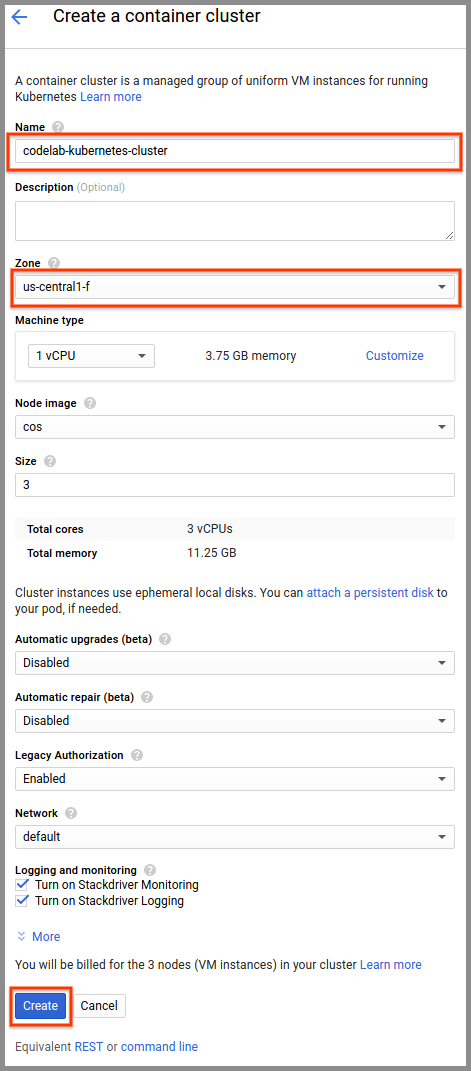
- Name the cluster “codelab-kubernetes-cluster”
- Select “us-central1-f” in the Zone drop down list.
- Click the Create button
Create a Spinnaker instance
- Navigate to the Spinnaker Launcher offering and click the Launch on Compute Engine button.
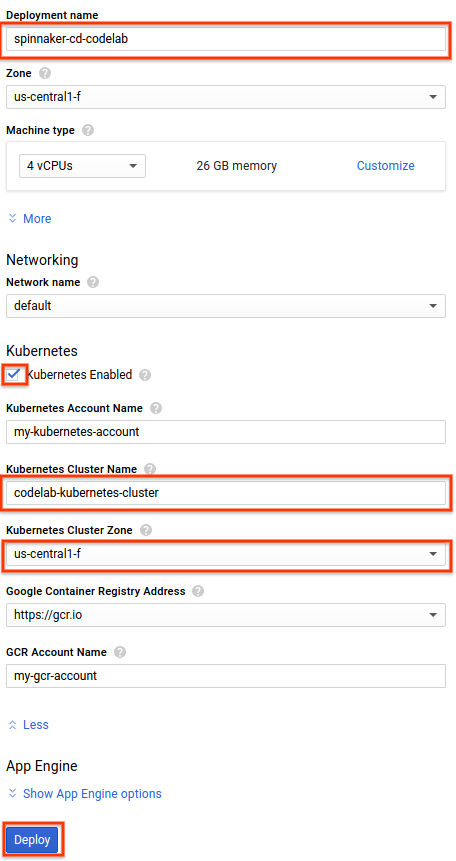 |
- Set the Deployment name “spinnaker-cd-codelab”
- Select “us-central1-f” in the Zone drop down list.
- Expand the Show Kubernetes options section at the bottom
- Check on the “Kubernetes Enabled” checkbox
- Enter the name of the Kubernetes Cluster you created in the step above (“codelab-kubernetes-cluster”)
- Select “us-central1-f” in the Kubernetes Cluster Zone drop down list.
- Click the Deploy button
This will provision a Spinnaker instance with providers set up for your Kubernetes cluster as well as your GCP project’s Container Registry.
Part 1: Code and Builds
Your Source Code
Create a GitHub project named “gcp-cd-codelab” and clone it locally. Create a
README.md file in the new GitHub repo before cloning it.
Add main.go:
package main

import (
	"io"
	"net/http"
)

func hello(w http.ResponseWriter, r *http.Request) {
	io.WriteString(w, "Hello World!")
}

func main() {
	http.HandleFunc("/", hello)
	http.ListenAndServe(":80", nil)
}
Add cloudbuild.yaml:
steps:
  - name: "gcr.io/cloud-builders/go"
    args: ["install", "github.com/{GITHUB_HANDLE}/gcp-cd-codelab"]
    env: ["PROJECT_ROOT=github.com/{GITHUB_HANDLE}/gcp-cd-codelab"]
  - name: "gcr.io/cloud-builders/docker"
    args: ["build", "-t", "gcr.io/{GCP_PROJECT_ID}/gcp-cd-codelab:$REVISION_ID", "-f", "Dockerfile", "."]
images:
  - "gcr.io/{GCP_PROJECT_ID}/gcp-cd-codelab:$REVISION_ID"
- Replace
GITHUB_HANDLEwith your GitHub handle - Replace
GCP_PROJECT_IDwith your GCP project ID
Add Dockerfile:
FROM alpine

COPY gopath/bin/gcp-cd-codelab /go/bin/gcp-cd-codelab

ENTRYPOINT /go/bin/gcp-cd-codelab
Set Up Your Automated Builds
Create a new triggered build:
- Navigate to Cloud Container Registry Build Triggers and click the Create trigger button.
- Select “GitHub” in the Select source options list and click the Continue button.
- Walk through the GitHub authentication flow and select your codelab GitHub project.
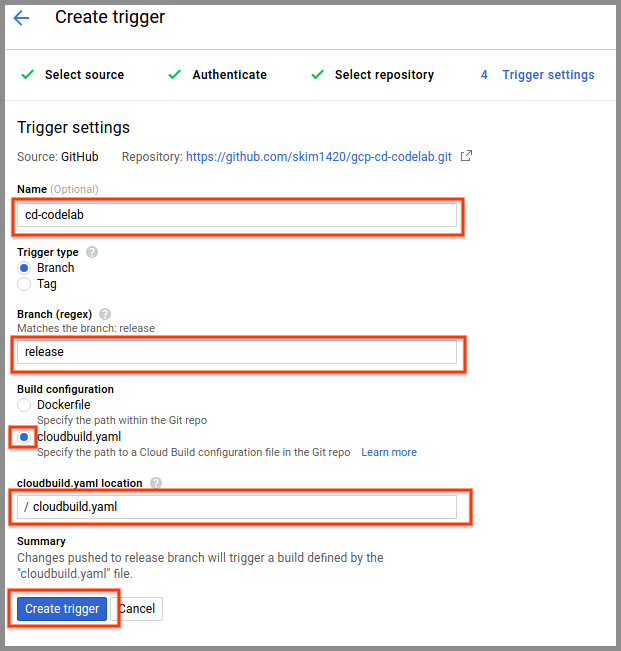
- After the repo mirroring completes, in the Trigger Settings section:
- Enter “cd-codelab” for Name.
- Leave the Trigger type to “Branch”.
- Enter “release” in the Branch field. There will be a warning that the name does not match any branch; you can ignore this as you will be creating the branch in the next part.
- Select “cloudbuild.yaml” for Build configuration.
- Enter “cloudbuild.yaml” for cloudbuild.yaml location.
- Click the Create trigger button
To try out the build, and to seed the container registry for selection later in Spinnaker, trigger the build by pushing to the release branch (note: if you have enabled GitHub two-factor authentication, you may need to generate a personal access token and use that in place of your GitHub password):
git checkout -b release
git add main.go cloudbuild.yaml Dockerfile
git commit -m 'First build!'
git push origin release
Part 2: Create Your Deployment Pipelines
Open an SSH tunnel through which your local workstation will connect to
Spinnaker. Fill in your GCP project for GCP_PROJECT_ID and the zone that
Spinnaker was created in for ZONE. Note that this command is the same as the
one provided in the Accessing Spinnaker through SSH Tunnel section after
you provisioned your Spinnaker instance using Cloud Launcher.
GCP_PROJECT_ID={GCP_PROJECT_ID}
GCP_ZONE={ZONE}

gcloud compute ssh spinnaker-cd-codelab \
    --project $GCP_PROJECT_ID \
    --zone $GCP_ZONE \
    --ssh-flag="-L 8084:localhost:8084" \
    --ssh-flag="-L 9000:localhost:9000"
Create a Spinnaker Application
From the Spinnaker home page, create a new Spinnaker Application by clicking on the Actions drop down at the upper right and clicking on Create Application.
In the New Application dialog:
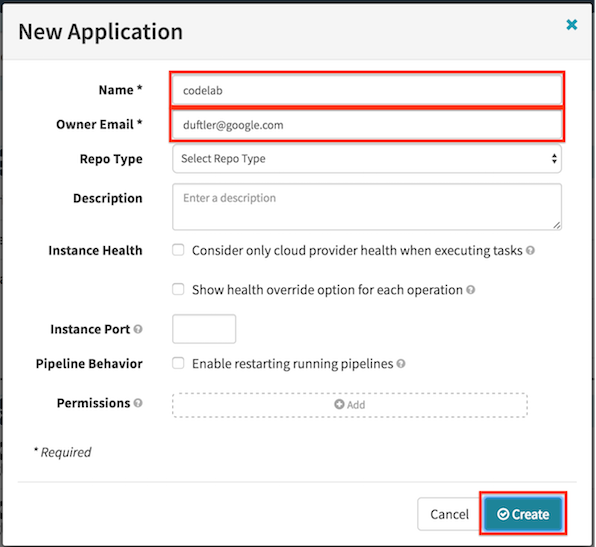
- Enter “codelab” for Name.
- Enter your email for Owner Email.
- Click the Create button.
Create Kubernetes Load Balancers
First we create 2 load balancers (“LoadBalancer” type services), one for our stage environment and another for our prod environment.
Navigate to the LOAD BALANCER page. Click the Create Load Balancer button, choose the kubernetes provider, and click Next.
In the Create New Load Balancer dialog:
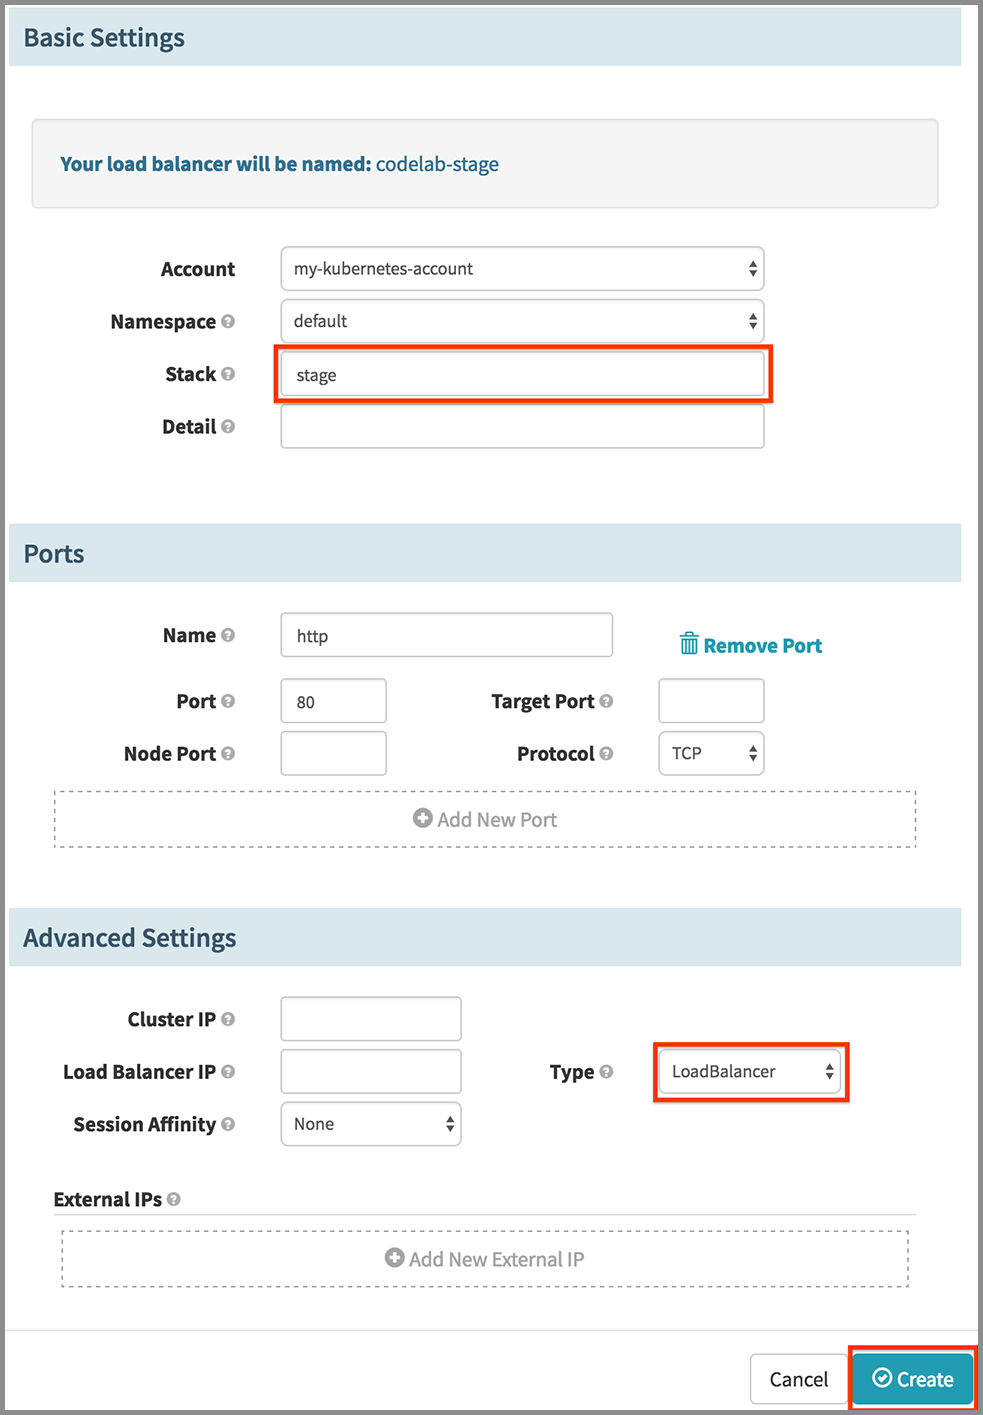
- Under Basic Settings section, enter “stage” for Stack.
- Under Advanced Settings section, select “LoadBalancer” in the Type drop down.
- Click the Create button.
Create a second load balancer, specifying “prod” for Stack.
Pipeline: Deploy to Stage
The purpose of this pipeline is to deploy the container that was built to a staging environment. We want this pipeline to be kicked off when a new image tag is pushed to the container registry for our app.
Navigate to the PIPELINES page and click the Create button. Name it “Deploy to Stage” and click the Create Pipeline button.
- Under the Automated Triggers heading, click Add Trigger.
- Select “Docker Registry” in the Type drop down.
- Select “my-gcr-account” for Registry Name.
- Select your project for Organization.
- Select “{YOUR_GCP_PROJECT_ID}/gcp-cd-codelab” for Image.
- Leave the tag blank.
Take the image that triggered this pipeline and deploy to “stage” environment:
- Click Add Stage.
- Select “Deploy” in the Type drop down.
- Under the Deploy Configuration section, click Add server group.
- Choose the kubernetes provider and click Next.
- In the Template Selection dialog that appears, click the Continue without a template button.
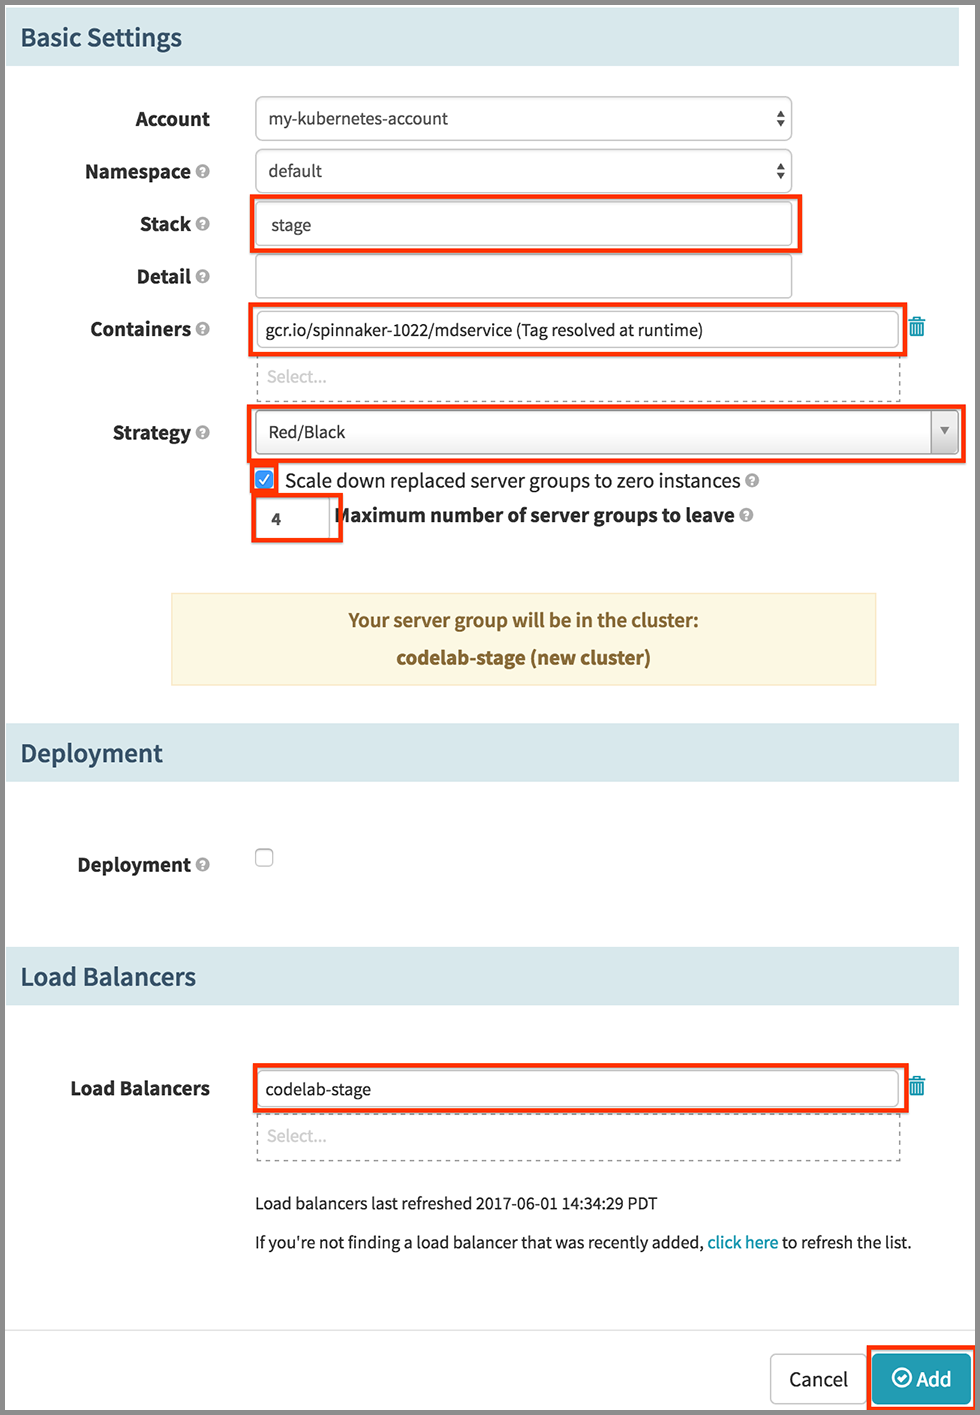
- In the Configure Deployment Cluster dialog:
- Enter “stage” for Stack.
- For Containers, choose the image that is marked “(Tag resolved at runtime)”.
- Select “Red/Black” in the Strategy drop down.
- Check on the Scale down replaced server groups to zero instances checkbox.
- Enter “4” for Maximum number of server groups to leave.
- Click in the Load Balancers field and select “codelab-stage”.
- Click the Add button.
Save the pipeline by clicking the Save Changes button at the bottom right.
Pipeline: Validate
This pipeline is a simple manual judgment pipeline for user validation of the stage deployment. We want this pipeline to kick off when the “Deploy to Stage” pipeline completes successfully.
From the PIPELINES page, click the Create button. Name it “Validate” and click the Create Pipeline button.
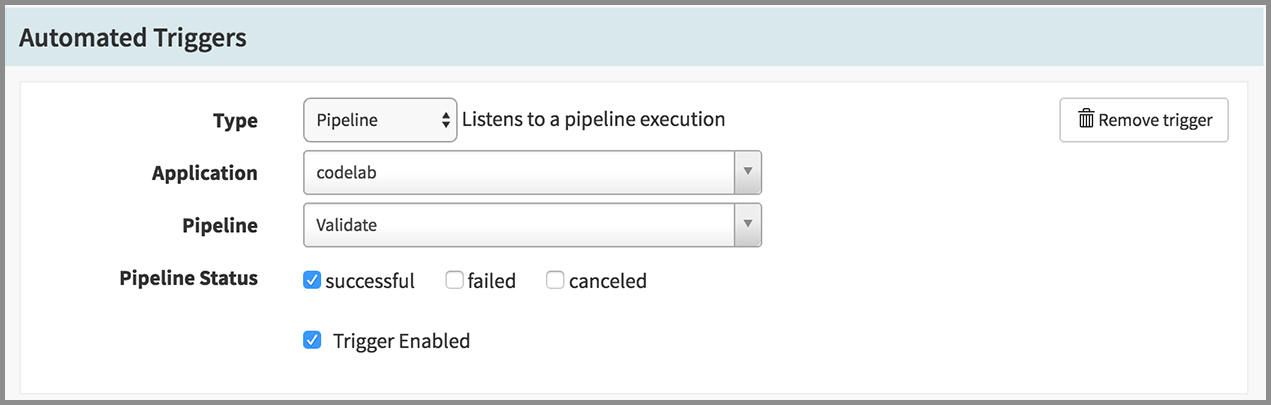
- Under the Automated Triggers heading, click Add Trigger.
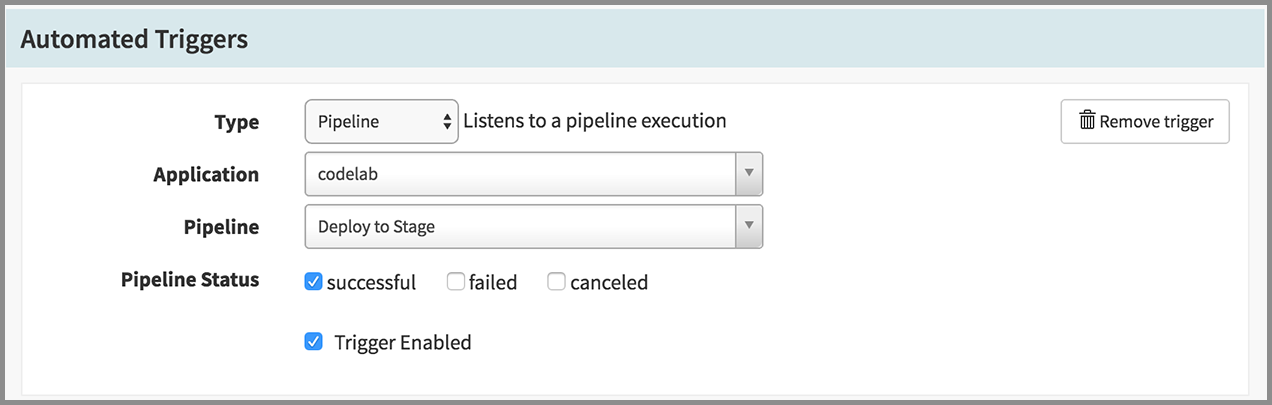
- Select “Pipeline” in the Type drop down.
- Select “codelab” for Application.
- Select “Deploy to Stage” for Pipeline.
- Check on “successful” for Pipeline Status
Ask the user for manual verification:
- Click Add Stage.
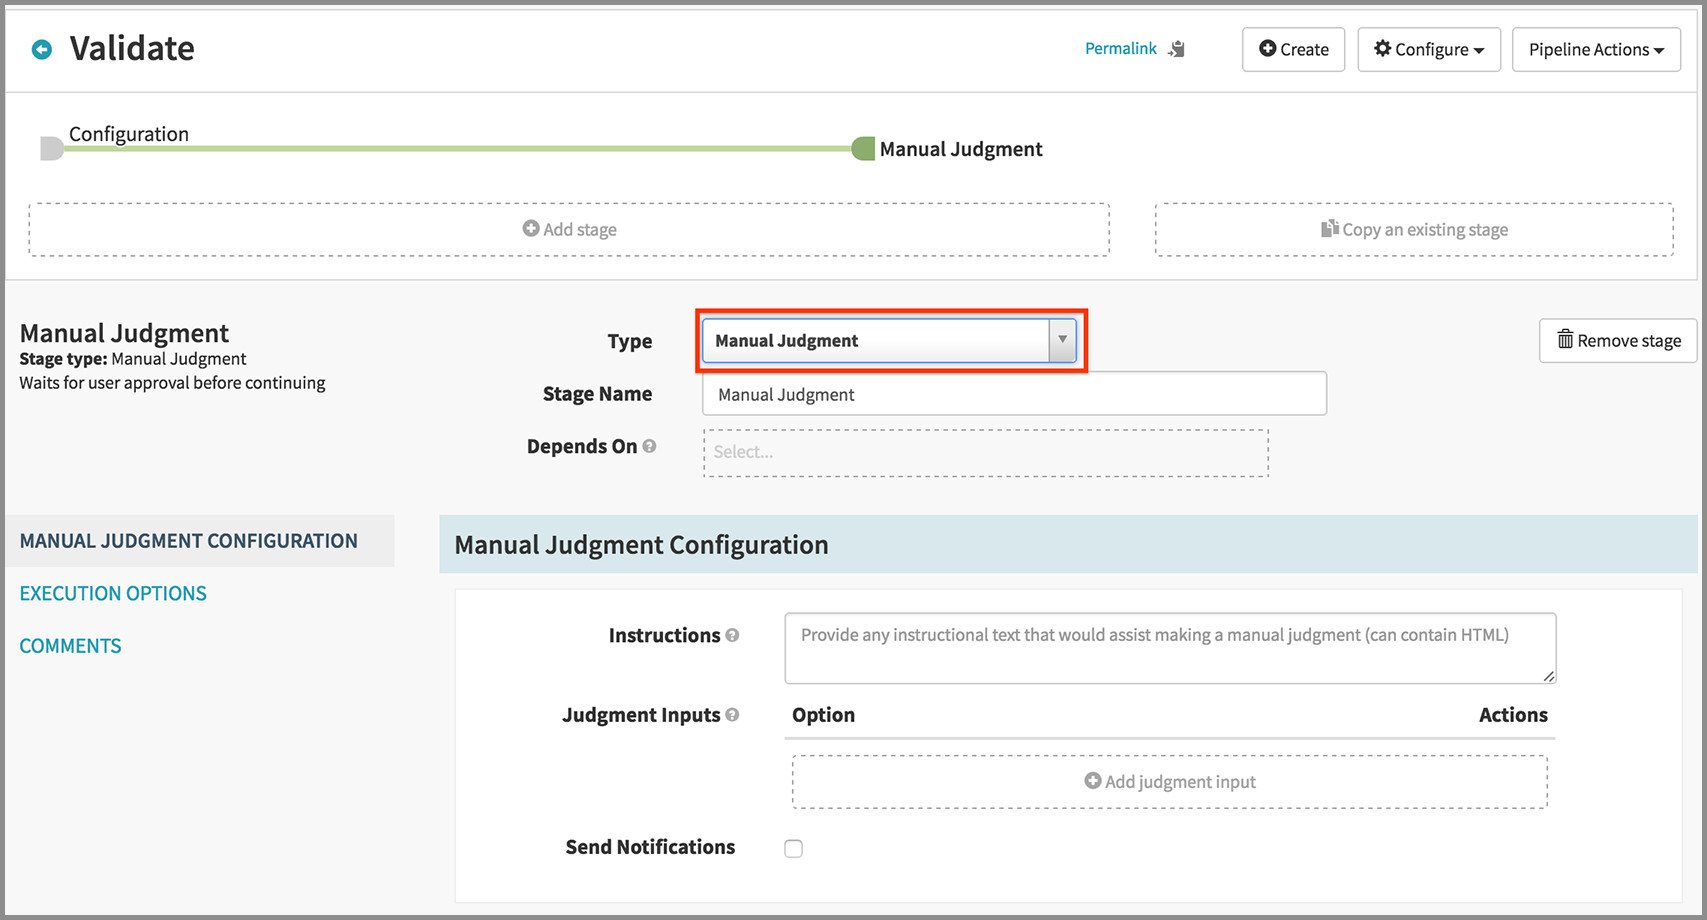
- Select “Manual Judgment” in the Type drop down.
Save the pipeline by clicking the Save Changes button at the bottom right.
Pipeline: Promote to Prod
This promotion pipeline takes what was previously deployed and validated in “stage” and makes a deployment out to prod. We want this pipeline to kick off when the “Validate” pipeline completes successfully.
From the PIPELINES page, click the Create button. Name it “Promote to Prod” and click the Create Pipeline button.
- Under the Automated Triggers heading, click Add Trigger.
- Select “Pipeline” in the Type drop down.
- Select “codelab” for Application.
- Select “Validate” for Pipeline.
- Check on “successful” for Pipeline Status
Find the image that was last deployed in “stage”:
- Click Add Stage.
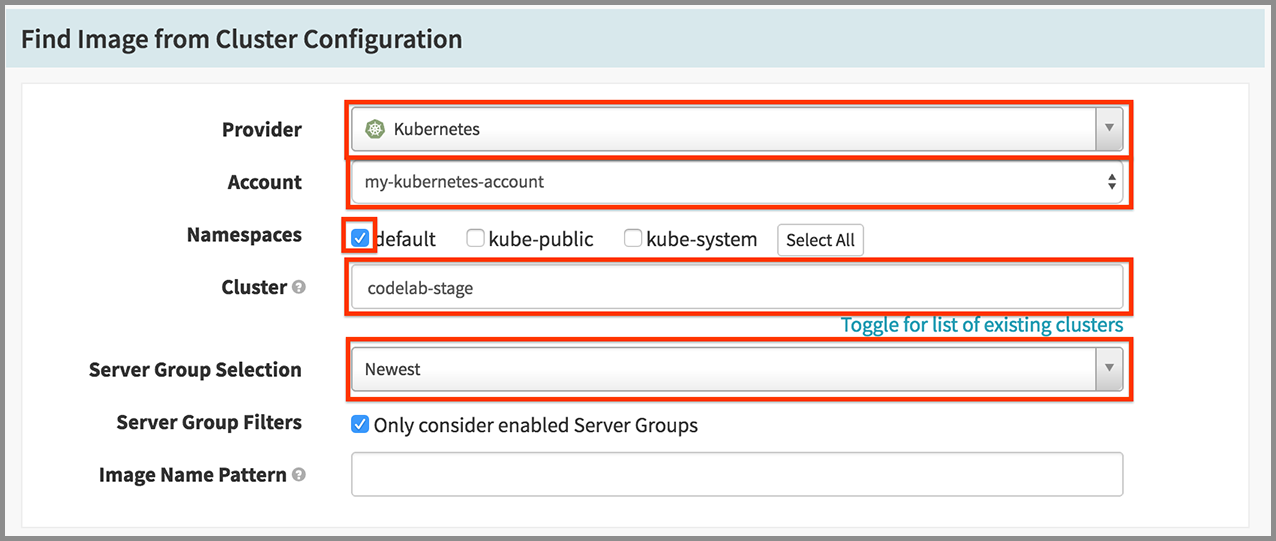
- Select “Find Image from Cluster” in the Type drop down.
- Select “Kubernetes” in the Provider drop down.
- Check on “default” for Namespaces.
- Enter “codelab-stage” for Cluster, where we’ll look for our image to deploy.
- Select “Newest” in the Server Group Selection drop down, since we want what was last deployed there.
Deploy this image to “prod”:
- Click Add Stage.
- Select “Deploy” in the Type drop down.
- In the Server Groups section, click Add server group.
- Choose the kubernetes provider and click Next.
- In the Template Selection dialog that appears, click the Continue without a template button.
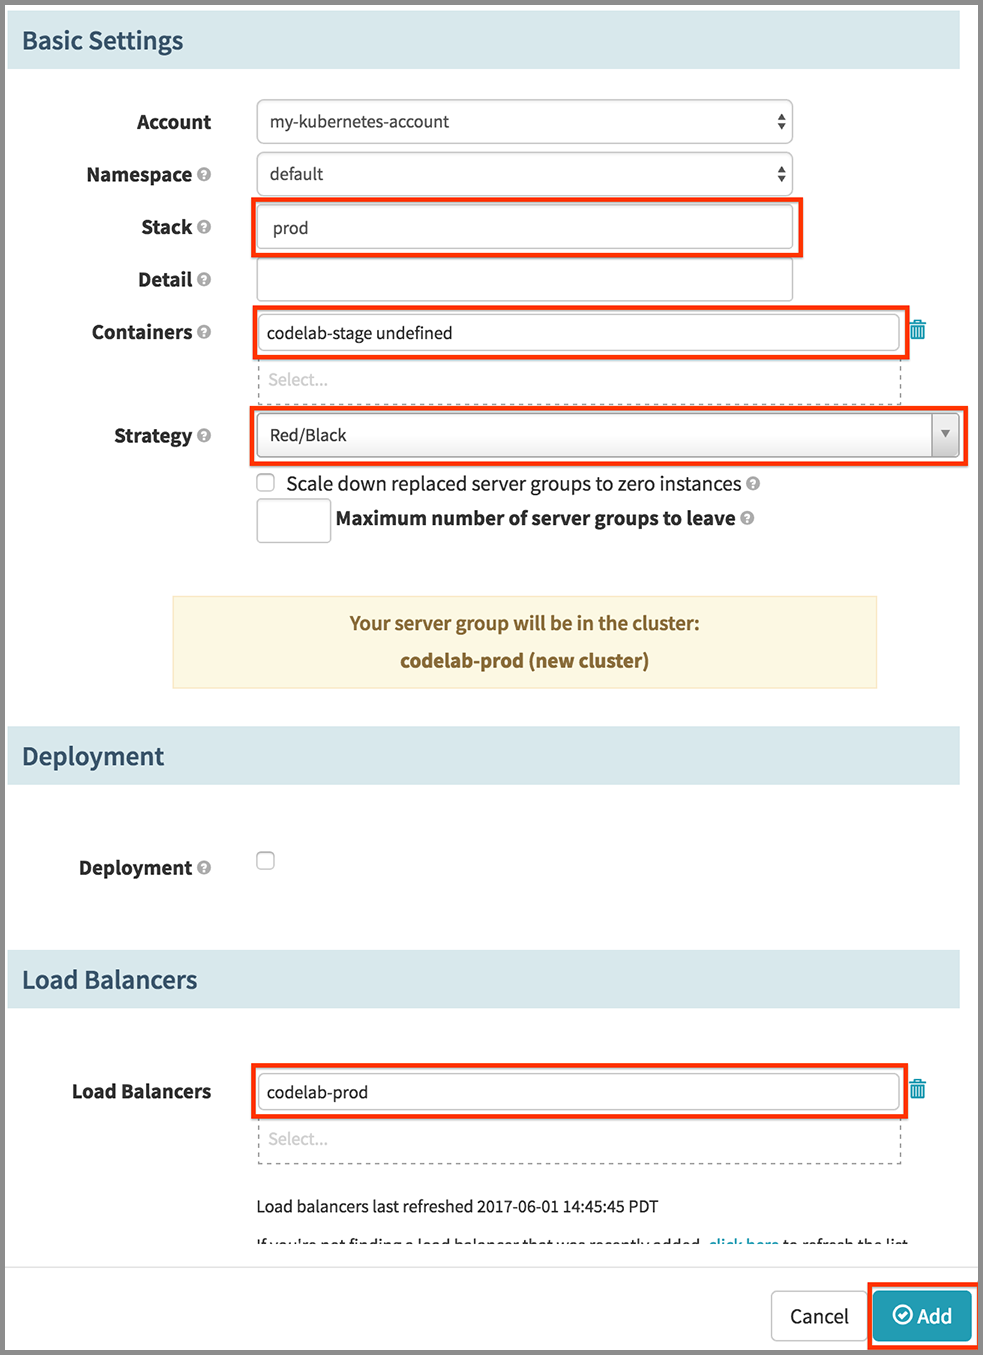
- In the Configure Deployment Cluster dialog:
- Enter “prod” for Stack.
- Select “codelab-stage undefined” for Containers.
- Select “Red/Black” in the Strategy drop down.
- Click in the Load Balancers field and select “codelab-prod”.
- Click the Add button.
Wait for a bit..
- Click Add Stage.
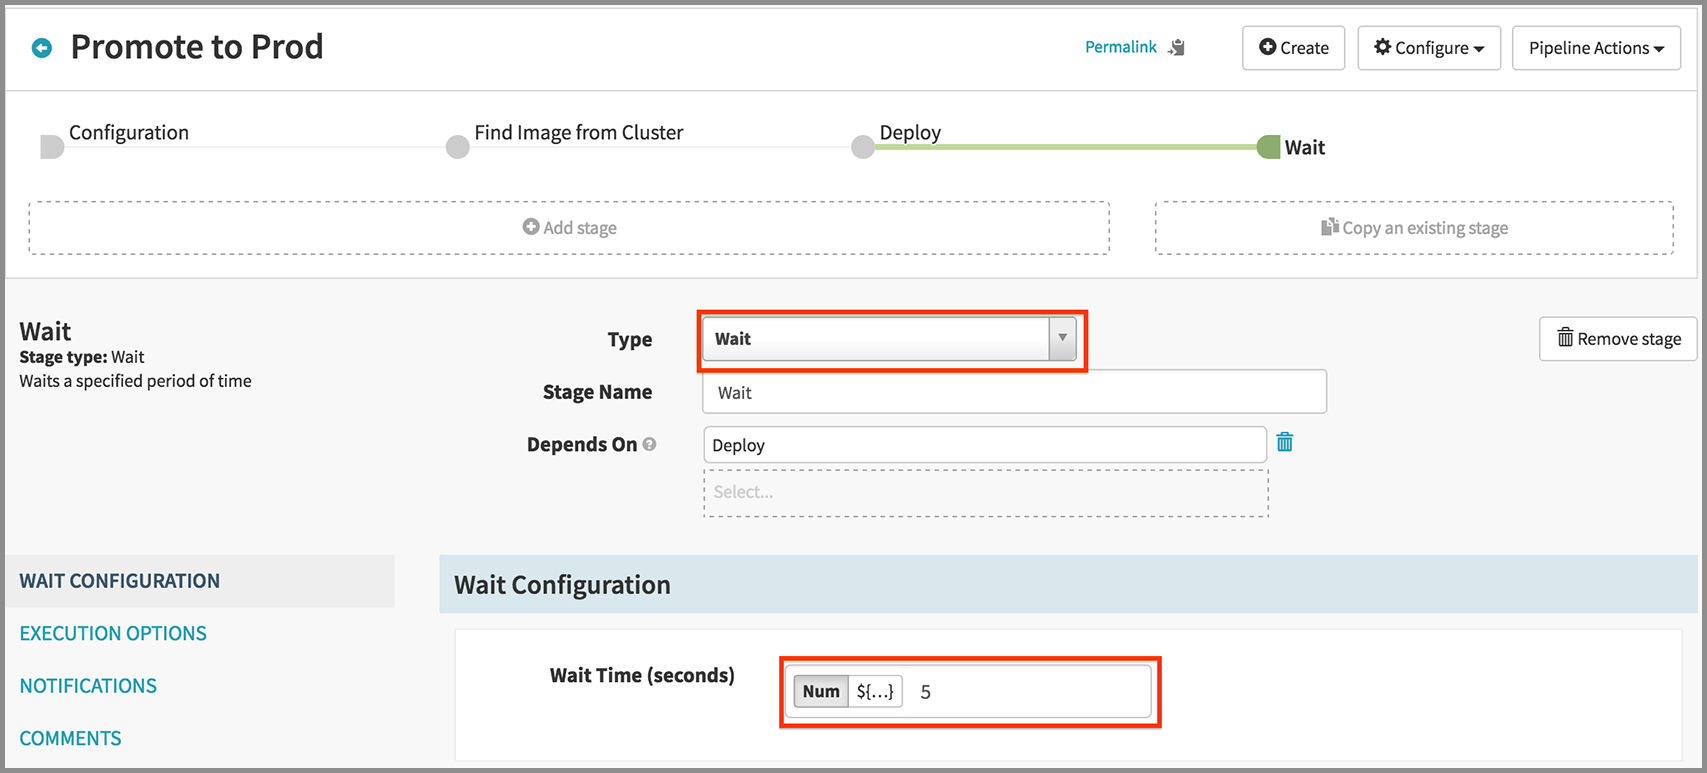
- Select “Wait” in the Type drop down.
- Enter “5” for Wait Time (seconds).
Scale down the old prod (but don’t destroy it yet):
- Click Add Stage.
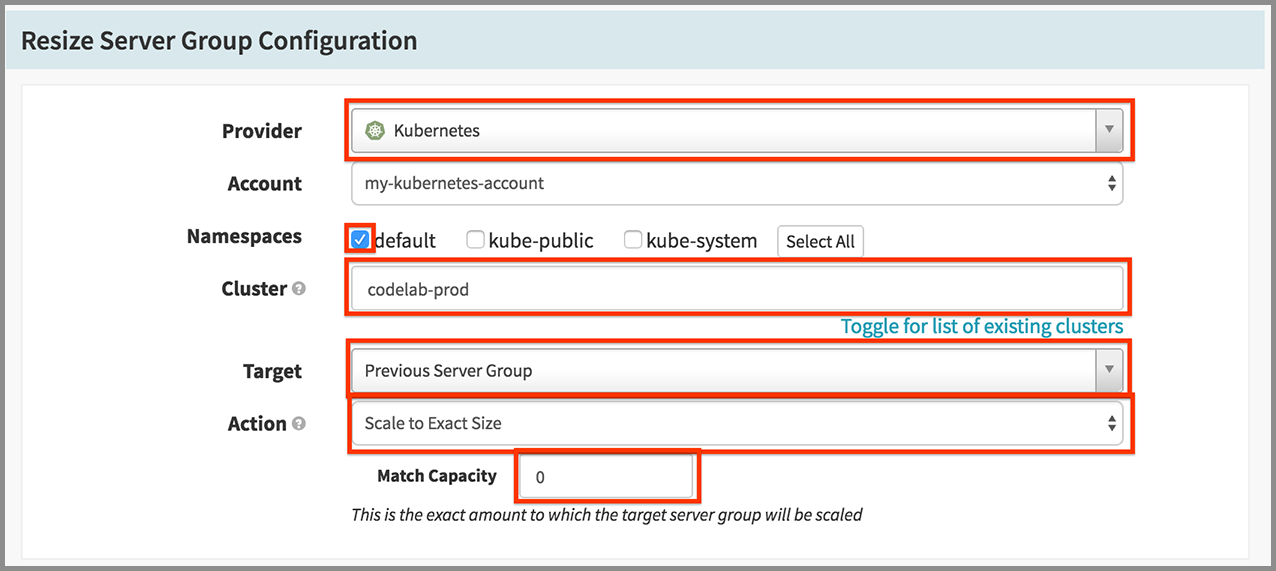
- Select “Resize Server Group” in the Type drop down.
- Select “Kubernetes” in the Provider drop down.
- Check on “default” for Namespaces.
- Enter “codelab-prod” for Cluster.
- Select “Previous Server Group” in the Target drop down.
- Select “Scale to Exact Size” in the Action drop down.
- Enter “0” for Match Capacity.
Wait for a bit again…
- Click Add Stage.
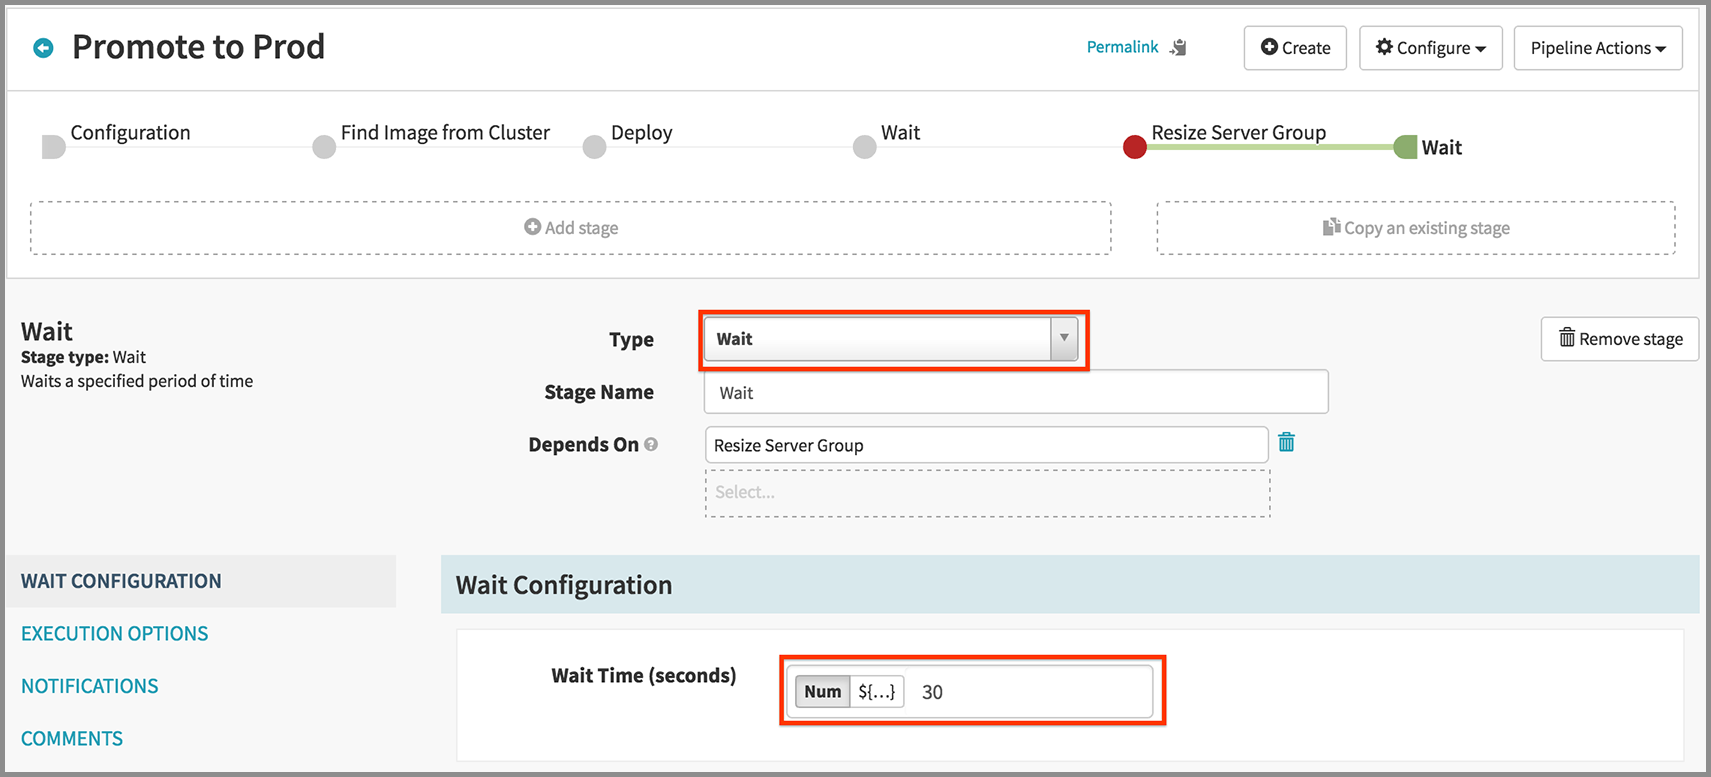
- Select “Wait” in the Type drop down.
- Enter “30” for Wait Time (seconds).
Finally, destroy the old prod altogether:
- Click Add Stage.
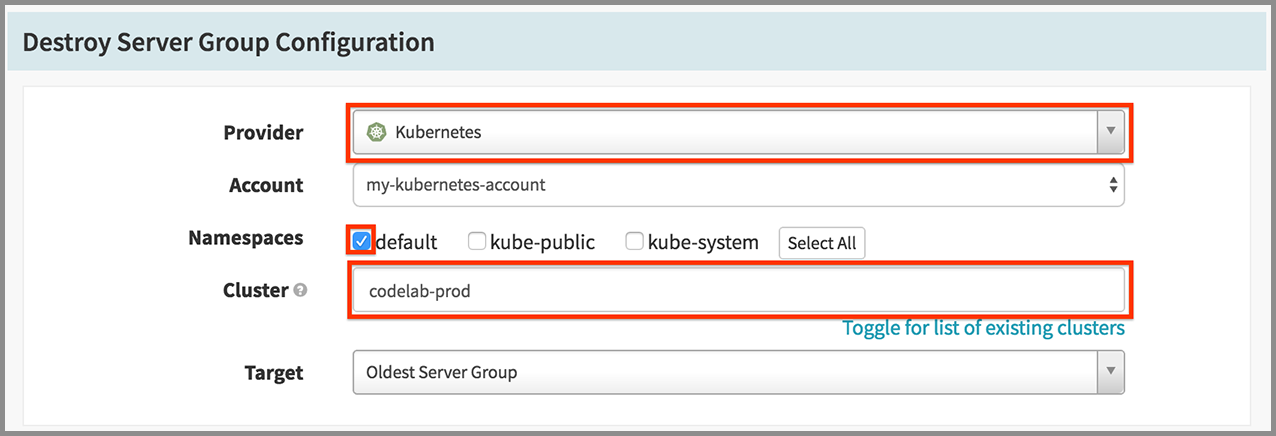
- Select “Destroy Server Group” in the Type drop down.
- Select “Kubernetes” in the Provider drop down.
- Check on “default” for Namespaces.
- Enter “codelab-prod” for Cluster.
- Select “Oldest Server Group” in the Target drop down.
Save the pipeline by clicking the Save Changes button at the bottom right.
Part 3: Run Your Setup
Promote code by pushing to a release branch in GitHub
Edit main.go and update the message:
package main

import (
	"io"
	"net/http"
)

func hello(w http.ResponseWriter, r *http.Request) {
	io.WriteString(w, "Hello GCP CD!")
}

func main() {
	http.HandleFunc("/", hello)
	http.ListenAndServe(":80", nil)
}
Push to the release branch:
git checkout release
git add main.go
git commit -m "New hello message"
git push origin release
Google Container Registry triggers a container build
This will trigger an automatic build by GCR. You can check the status of your build by navigating to the Cloud Console Build history section.
When the build completes, a new container image will be added to your registry, tagged with the git hash of the last commit. Navigate to Cloud Console Container Registry to see.
Spinnaker pipeline deploys the container to a staging environment
A new tag will trigger the Spinnaker “Deploy to Stage” pipeline to trigger, resulting in the creation of a new Spinnaker Server Group, which corresponds to a Kubernetes replica set.
Validate the deployment in the staging environment
Naviate to Spinnaker’s CLUSTERS page, where you should see a “codelab-stage” cluster with one server group deployed to it. Next to the server group, click the load balancer icon (blue upside-down pitchfork thing). An info pane on the right will contain a link, “Ingress IPs”. Clicking on it will open a new page with your recent code changes included.

If you don’t see your new message, the princess is in another castle. Start over at the top of this codelab.
When your new change has been validated, navigate back to the PIPELINES tab, click on the pending stage of the “Validate” pipeline (yellow bar) and click the “Continue” button.
Spinnaker pipeline promotes the container to the production Kubernetes
environment
You’ll see the “Promote to Prod” pipeline kick off. The first time that you run this, the “Resize Server Group” stage will fail, as past deployments don’t exist. This is normal, and if you’d like to see the full effect you can run through this section (Part 3) again. Also, various stages can take a while (no longer than 5 minutes), so be patient!
Part 4: Tear Down
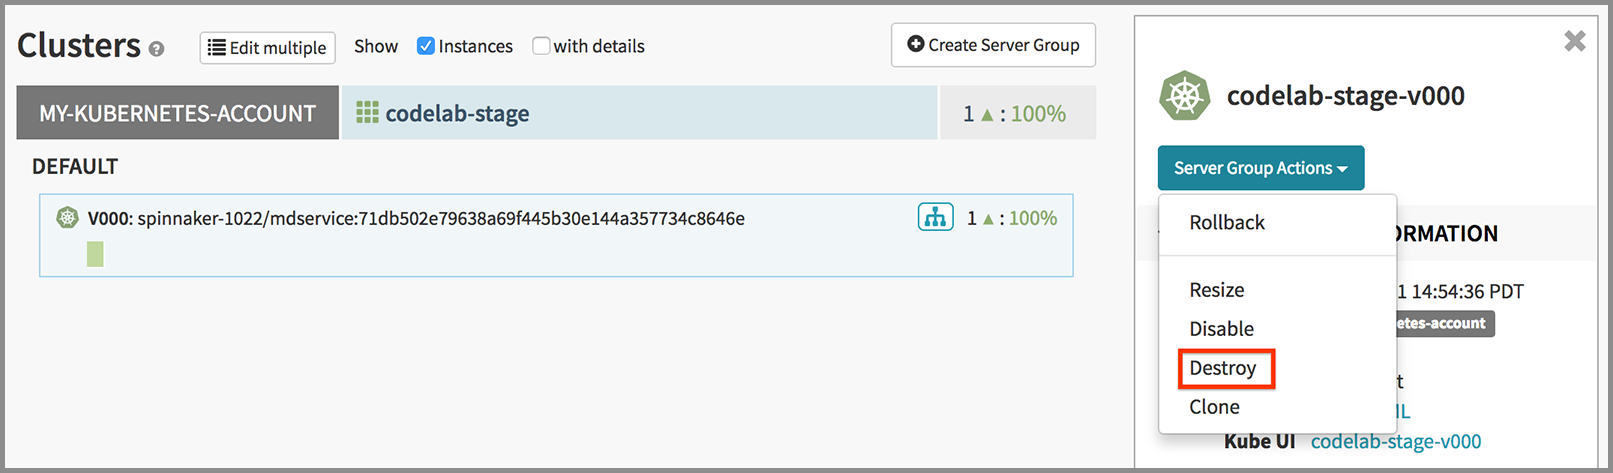
Destroy your server groups
Click on each server group and use the context menu to destroy it:
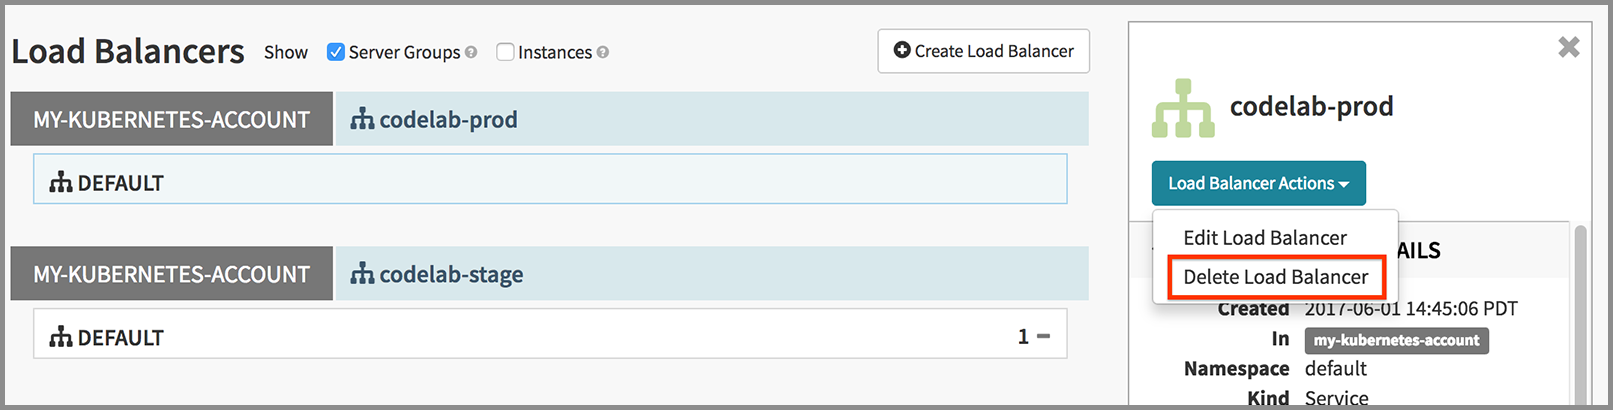
Delete your load balancers
Click on each load balancer and use the context menu to delete it:
Delete the Cloud Launcher Deployment
Delete the Deployment and associated GCE VM provisioned by Cloud Launcher: spinnaker-cd-codelab deployment
Delete the GCS bucket
Delete the GCS bucket. Should have a
name like spinnaker-{GCP_PROJECT_ID}.