Kubernetes Source To Prod
In this codelab you will be creating a set of basic pipelines for deploying code from a Github repo to a Kubernetes cluster in the form of a Docker container.
Given that there are a number of fully-featured docker registries that both store and build images, Spinnaker doesn’t build Docker images but instead depends on any registry that does.
The workflow generally looks like this:
- Push a new tag to your registry. (Existing tag changes are ignored for the sake of traceability - see below).
- Spinnaker sees the tag and deploys the new tag in a fresh Replica Set, and optionally deletes or disables any old Replica Sets running this image.
- The deployment is verified externally.
- Spinnaker now redeploys this image into a new environment (production), and disables the old version the Replica Set was managing
Existing tags are ignored for the sake of traceability.
The rational is that repeatedly deploying the same tag (
:latest,:v2-stable, etc…) reduces visibility into what version of your application is actually serving traffic. This is particularly true when you are deploying new versions several times a day, and different environments (staging, prod, test, dev, etc…) will each have different versions changing at different cadences.Of course, there is nothing wrong with updating a stable tag after pushing a new tag to your registry to maintain a vetted docker image. There are also ways to ensure only a subset of docker tags for a particular image can trigger pipelines, but that’ll be discussed in a future codelab.
0. Setup
We need a few things to get this working.
- A Github repo containing the code we want to deploy.
- A Dockerhub repo configured to build on changes to the above repo.
- A running Kubernetes cluster.
- A running Spinnaker deployment configured with the contents of steps 2 and 3.
Configuring Github
The code I’ll be deploying is stored here. Feel free to fork this into your own account, and make changes/deploy from there. What’s needed is a working Dockerfile at the root of the repository that can be used to build some artifact that you want to deploy. If you’re completely unfamiliar with Docker, I recommend starting here.
Configuring Dockerhub
Create a new repository on Dockerhub. This guide covers how to get your Github repository hooked up to your new Dockerhub repository by creating an automated build that will take code changes and build Docker images for you. In the end your repository should look something like this.
Make sure Github is configured to send events to Dockerhub.
This can be set under your Github repositories Settings > Webhooks & Services > Services > Docker.
Configuring Kubernetes
Follow one of the guides here. Once you are finished, make sure that you have an up-to-date ~/.kube/config file that points to whatever cluster you want to deploy to. Details on kubeconfig files here.
Configuring Spinnaker
We will be deploying Spinnaker to the same Kubernetes cluster it will be managing. To do so, follow the installation guide, being sure to enable & create a Kubernetes account, as well as a Docker Registry account with credentials and repositories pointing at those created above.
1. Create a Spinnaker application
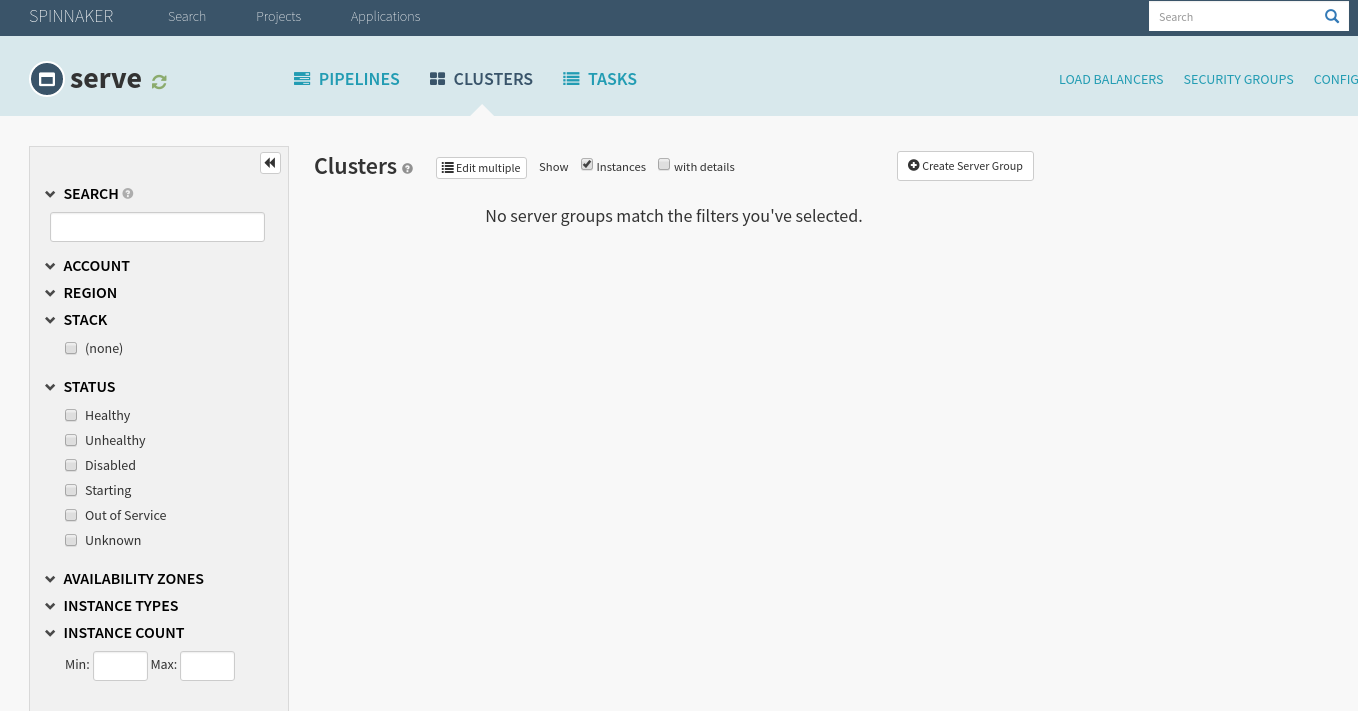
Spinnaker applications are groups of resources managed by the underlying cloud provider, and are delineated by the naming convention <app name>-. Since Spinnaker and a few other Kubernetes-essential pods are already running in your cluster, your Applications tab will look something like this:

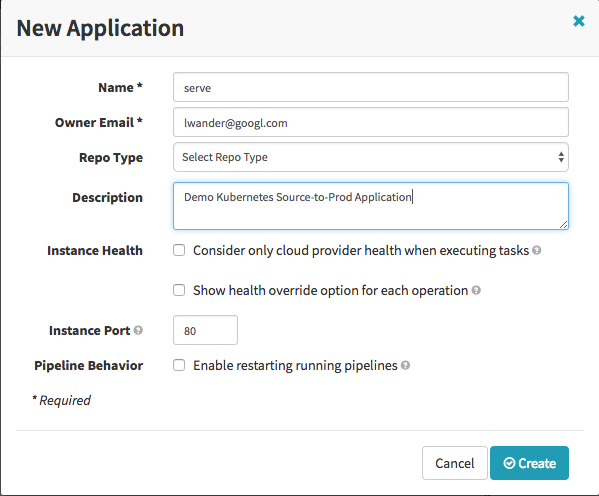
Under the Actions dropdown select Create Application and fill out the following dialog:
If you’ve followed the Source to Prod tutorial for the VM based providers, you’ll remember that you needed to select “Consider only cloud provider health when executing tasks”. Since Kubernetes is the sole health provider by definition, selecting this here is redundant, and unnecessary.
You’ll notice that you were dropped in this Clusters tab for your newly created application. In Spinnaker’s terminology a Cluster is a collection of Server Groups all running different versions of the same artifact (Docker Image). Furthermore, Server Groups are Kubernetes Replica Sets, with support for Deployments incoming.
2. Create a load balancer
We will be creating a pair of Spinnaker Load Balancers (Kubernetes Services) to serve traffic to our dev and prod versions of our app. Navigate to the Load Balancers tab, and select Create Load Balancer in the top right corner of the screen.
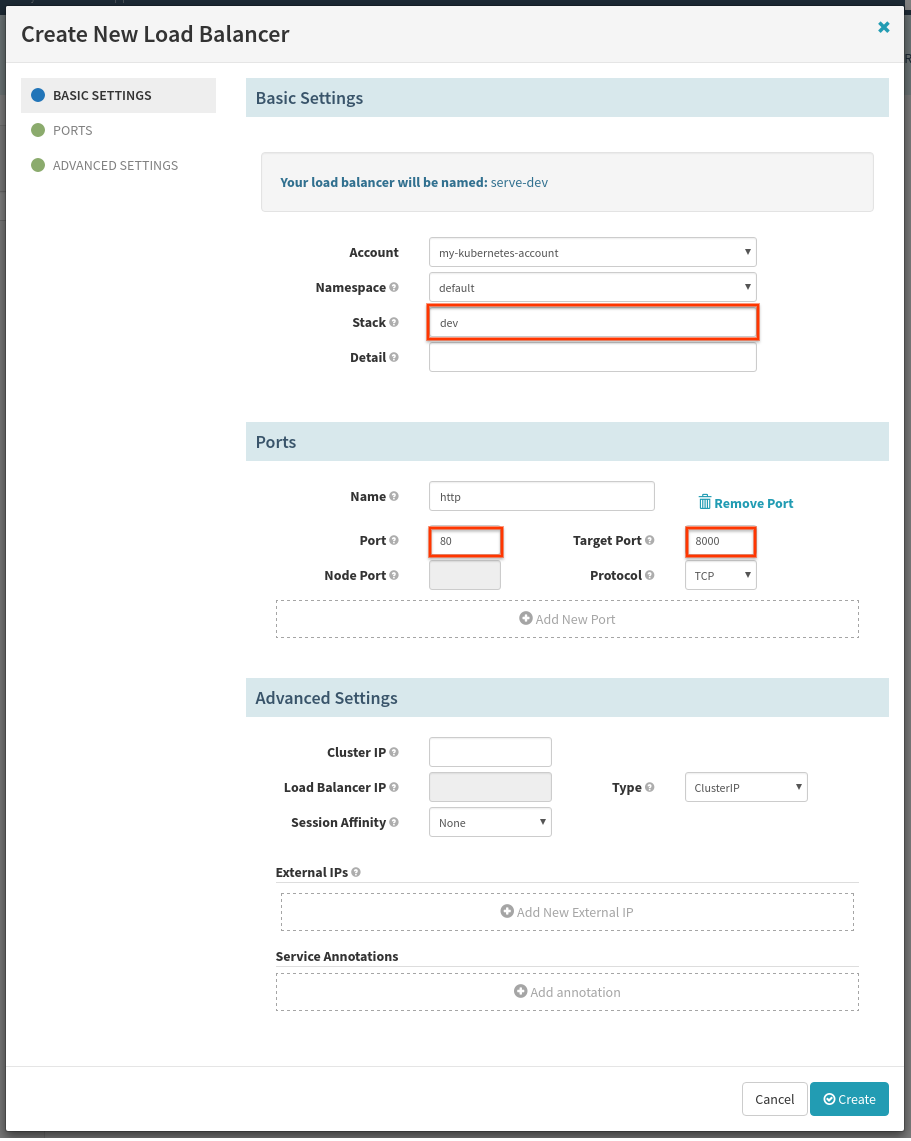
First we will create the dev Load Balancer:
The fields highlighted in red are the ones we need to fill out. “Port” is the port the load balancer will be listening out, and “Target Port” is the port our server is listening on. “Stack” exists for naming purposes.
Once the dev Load Balancer has been created, we will create an external-facing load balancer. Select Create Load Balancer again:
Fill out the fields in red again, changing “Load Balancer IP” to a static IP reserved using your underlying cloudprovider. If you do not have a static IP reserved, you may leave “Load Balancer IP” blank and an ephemeral IP will be assigned.
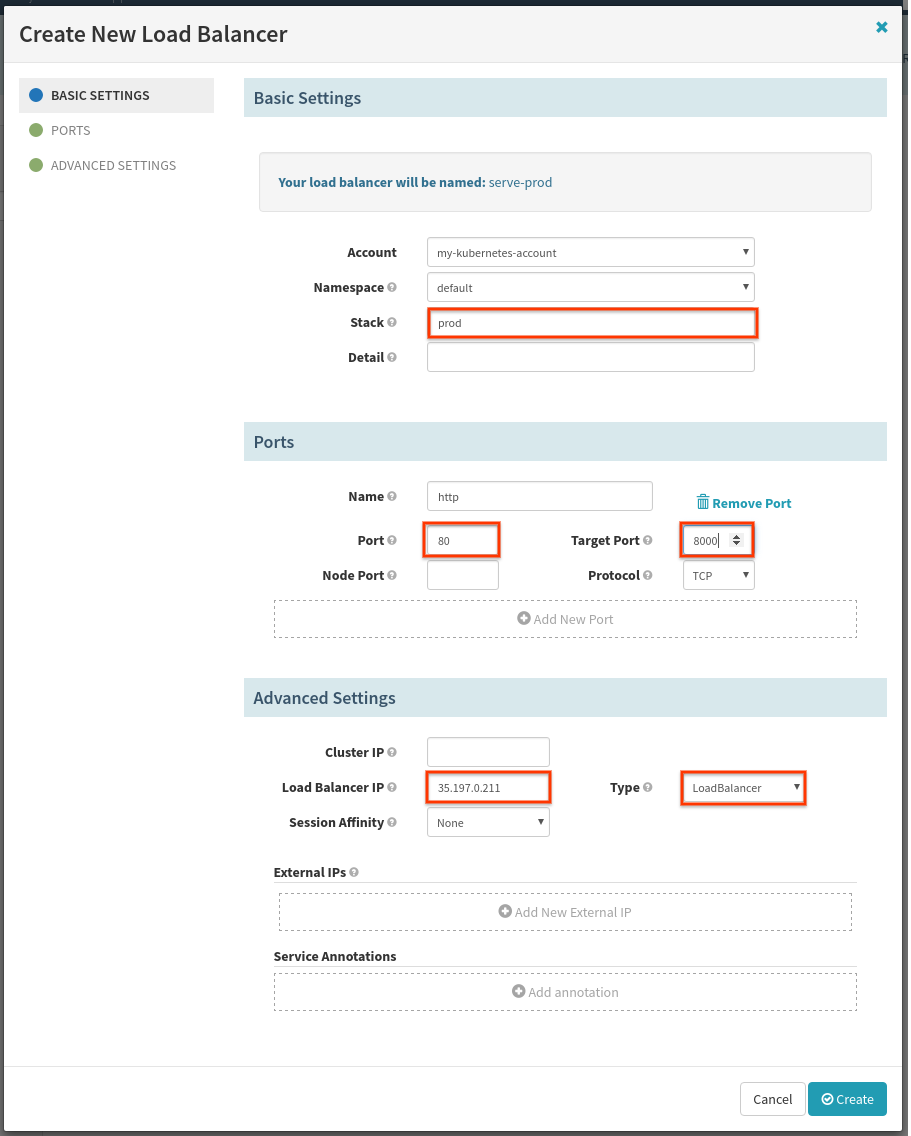
If your cloud provider (GKE, AWS, etc…) doesn’t support Type: LoadBalancer
…. you may need to change Type to Node Port. Read more here.
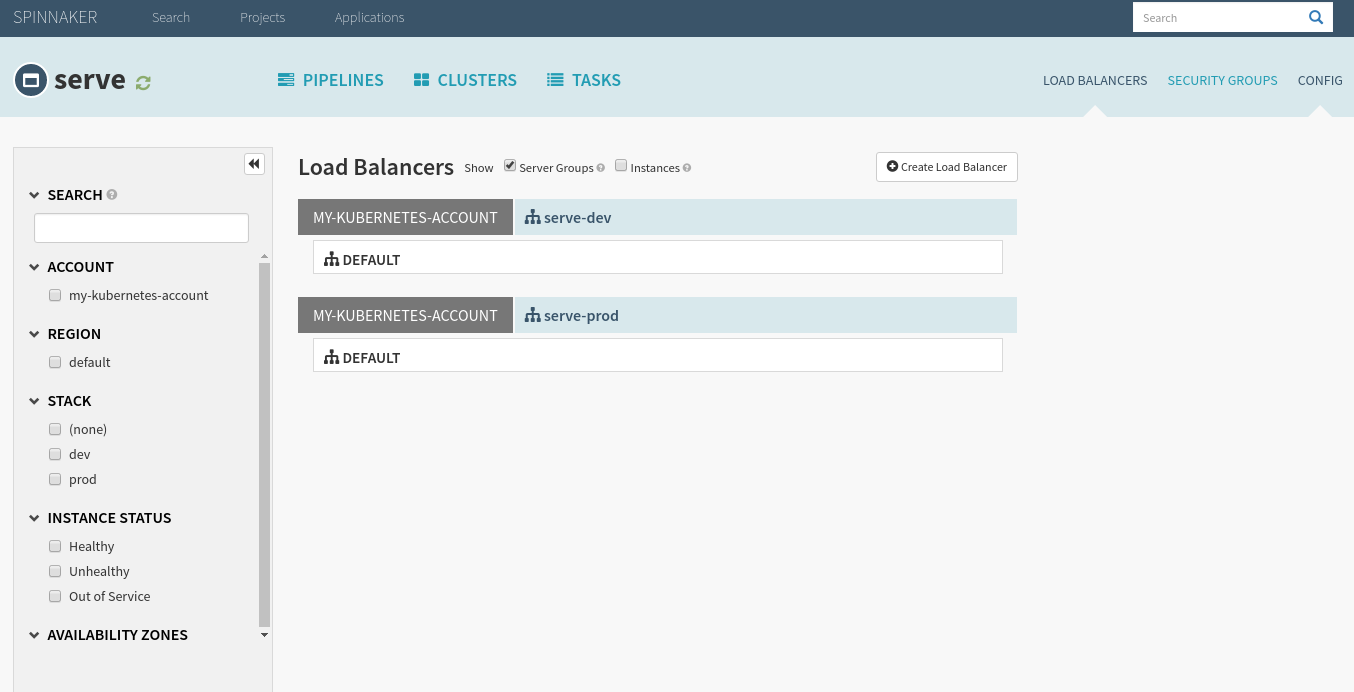
At this point your Load Balancers tab should look like this:
3. Create a demo server group
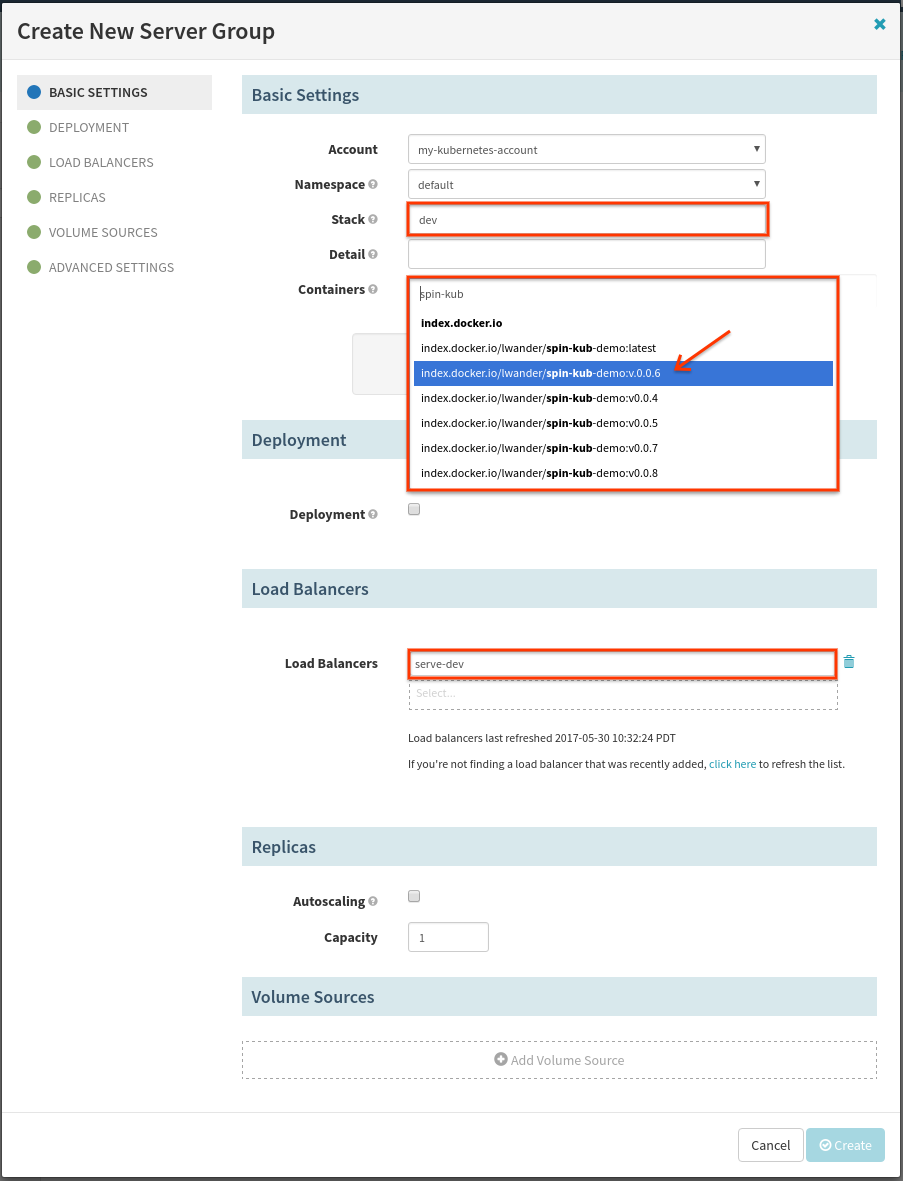
Next we will create a Server Group as a sanity check to make sure we have set up everything correctly so far. Before doing this, ensure you have at least 1 tag pushed to your Docker registry with the code you want to deploy. Now on the Clusters screen, select Create Server Group/Job, choose Server Group from the drop down and hit Next to see the following dialog:
Make sure that you select the -dev load balancer that we selected earlier.
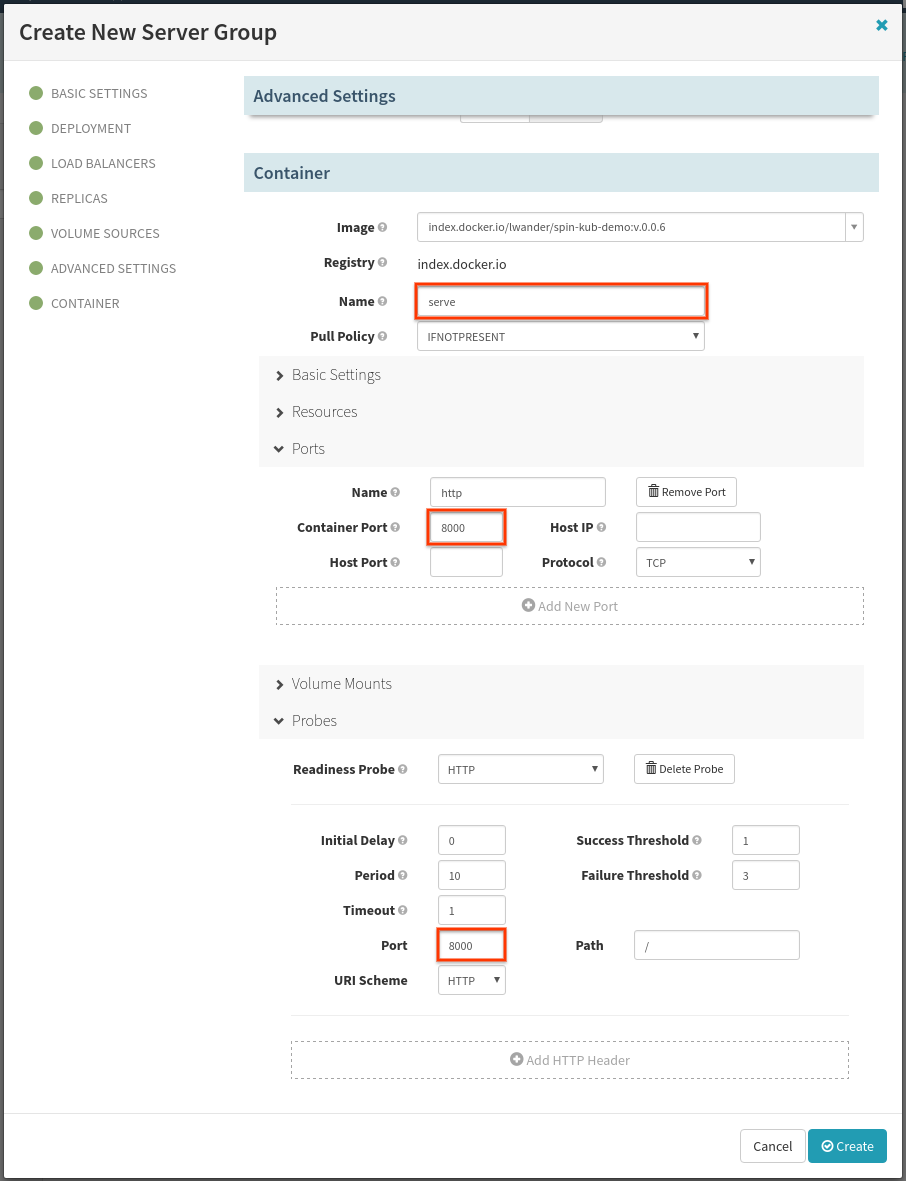
Scroll down to the newly created Container subsection, and edit the following fields:
Under the “Probes” subsection, select “Enable Readiness Probe”. This will prevent pipelines and deploys from continuing until the containers pass the supplied check and report themselves as “Healthy”.
Once the create task completes, open a terminal and type $ kubectl proxy, and now navigate in your browser to serve-dev to see if your application is serving traffic correctly.
kubectl proxy
kubectl proxyforwards traffic to the Kubernetes API server authenticated using your local~./kube/configcredentials. This way we can peek into what the internalserve-devservice is serving on port 80.
Once you’re satisfied, don’t close the proxy or browser tab just yet as we’ll use that again soon.
4. Git to dev pipeline
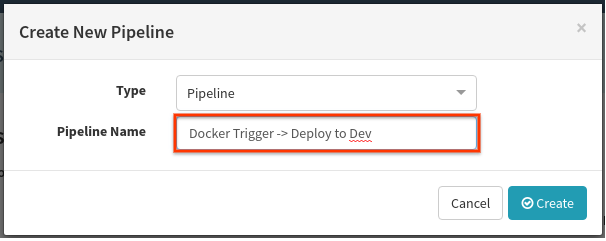
Now let’s automate the process of creating server groups associated with the dev loadbalancer. Navigate to the Pipelines tab, select Create and then fill out the resulting dialog as follows:
In the resulting page, select Add Trigger, and fill the form out as follows:
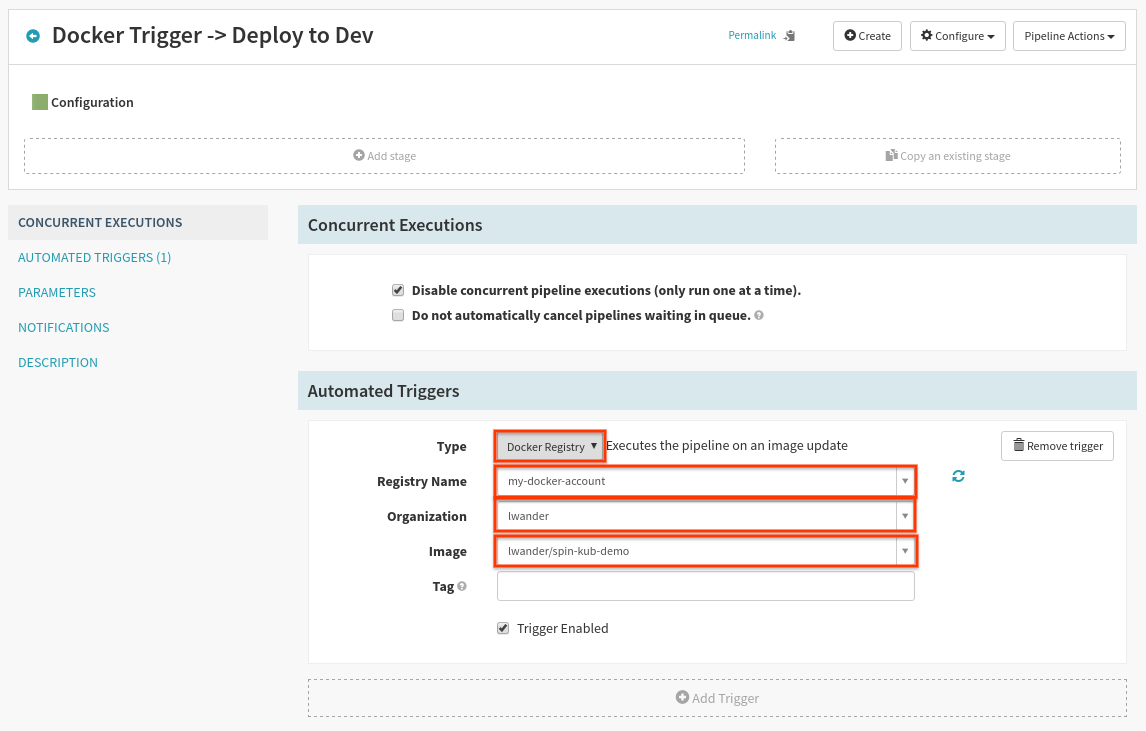
The “Organization” and “Image” will likely be different, as you have set up your own Docker repository.
The “Tag” can be a regex matching a tag name patterns for valid triggers. Leaving it blank serves as “trigger on any new tag”.
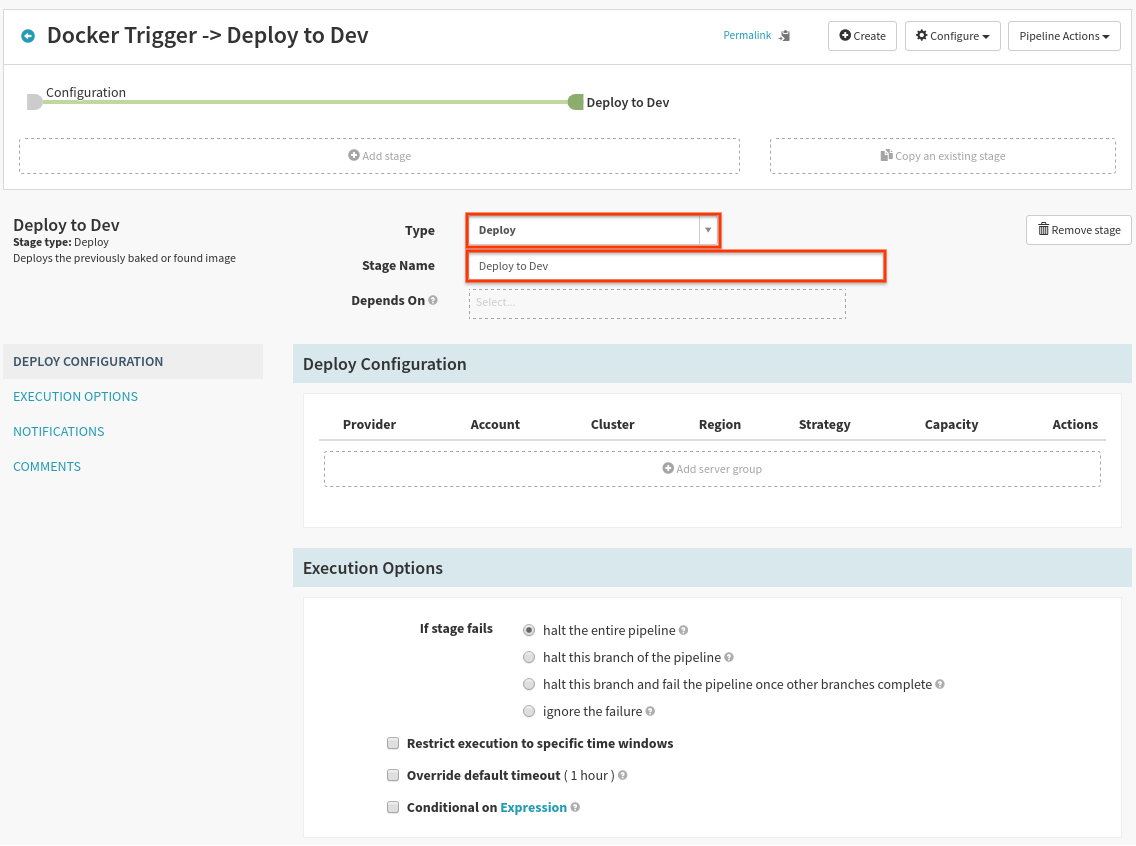
Now select Add Stage just below Configuration, and fill out the form as follows:
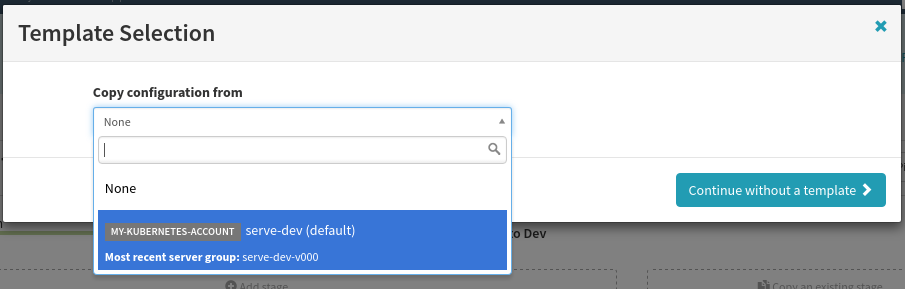
Next, in the Server Groups box select Add Server Group, where you will use the already deployed server group as a template like so:
Any server group in this app can be used as a template, and vastly simplifies configuration (since most configuration is copied over). This includes replica sets deployed with “kubectl create -f $FILE”.
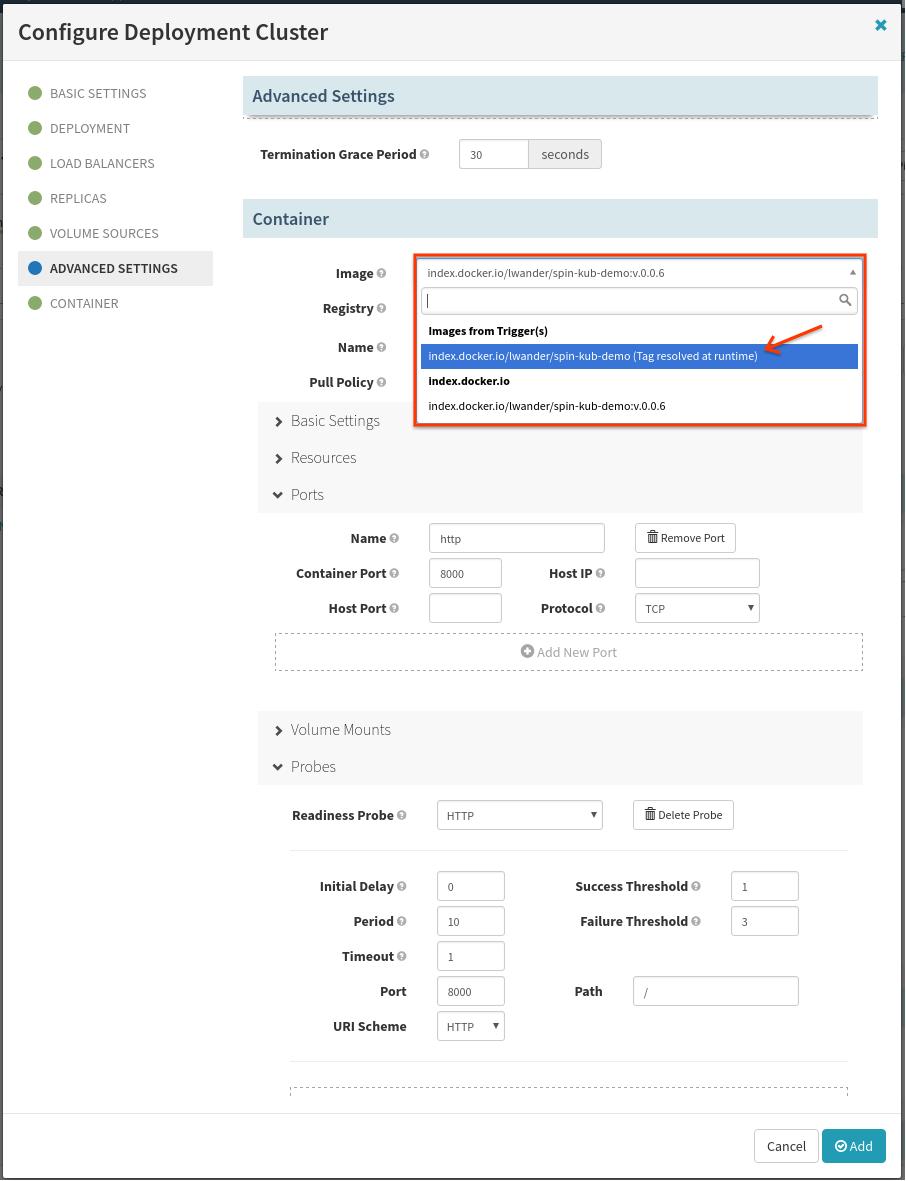
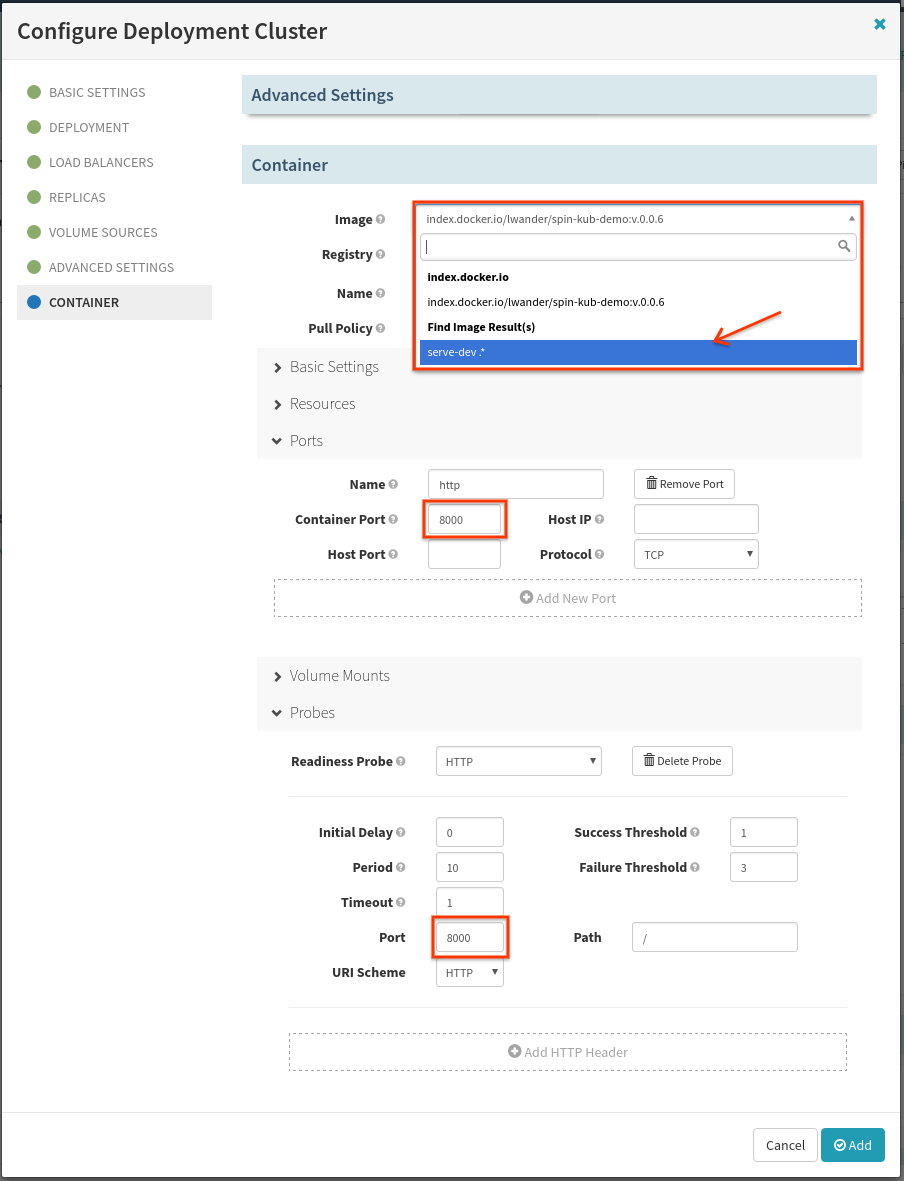
In the resulting dialog, we only need to make one change down in the Container subsection. Select the image that will come from the Docker trigger as shown below:
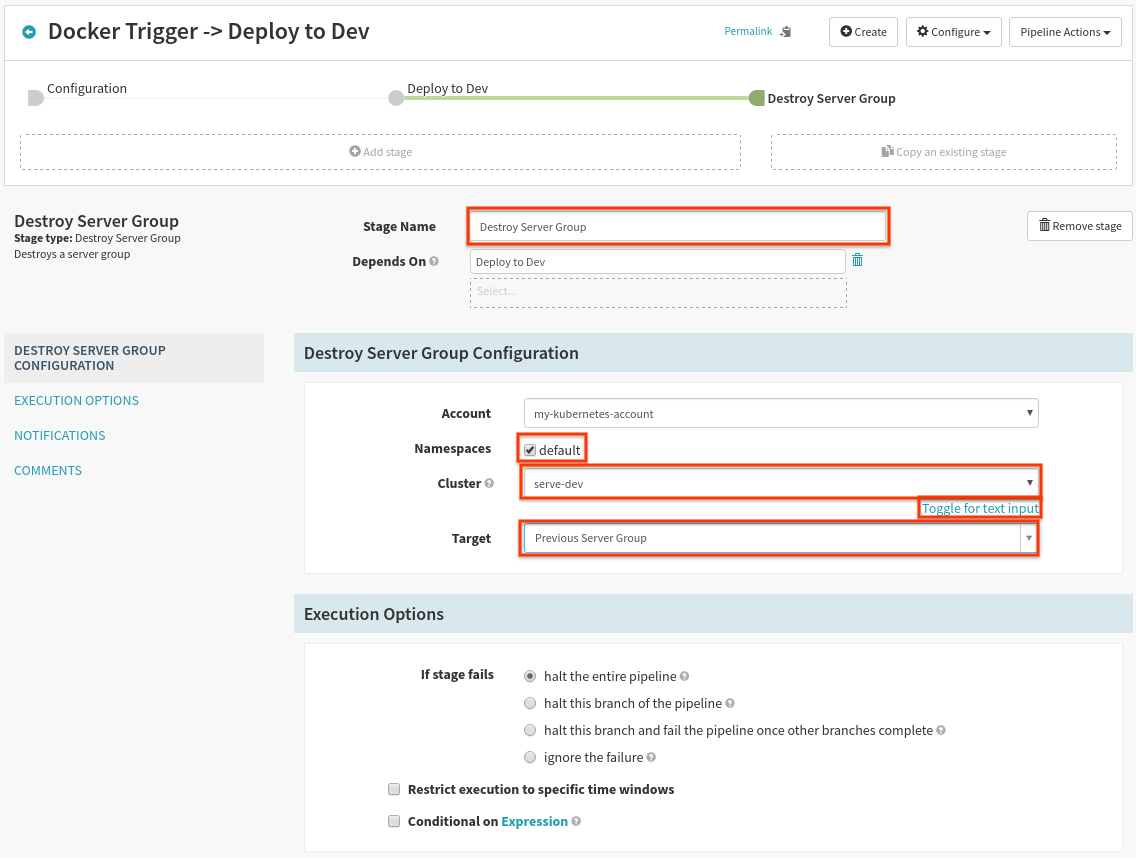
Lastly, we want to add a stage to destroy the previous server group in this dev cluster. Select Add Stage, and fill out the form as follows:
Make sure to select “default” as the namespace, and “toggle for list of clusters” to make cluster selection easier. “Target” needs to be “Previous Server Group”, so whatever was previously deployed is deleted after our newly deployed server group is “Healthy”.
5. Verification pipeline
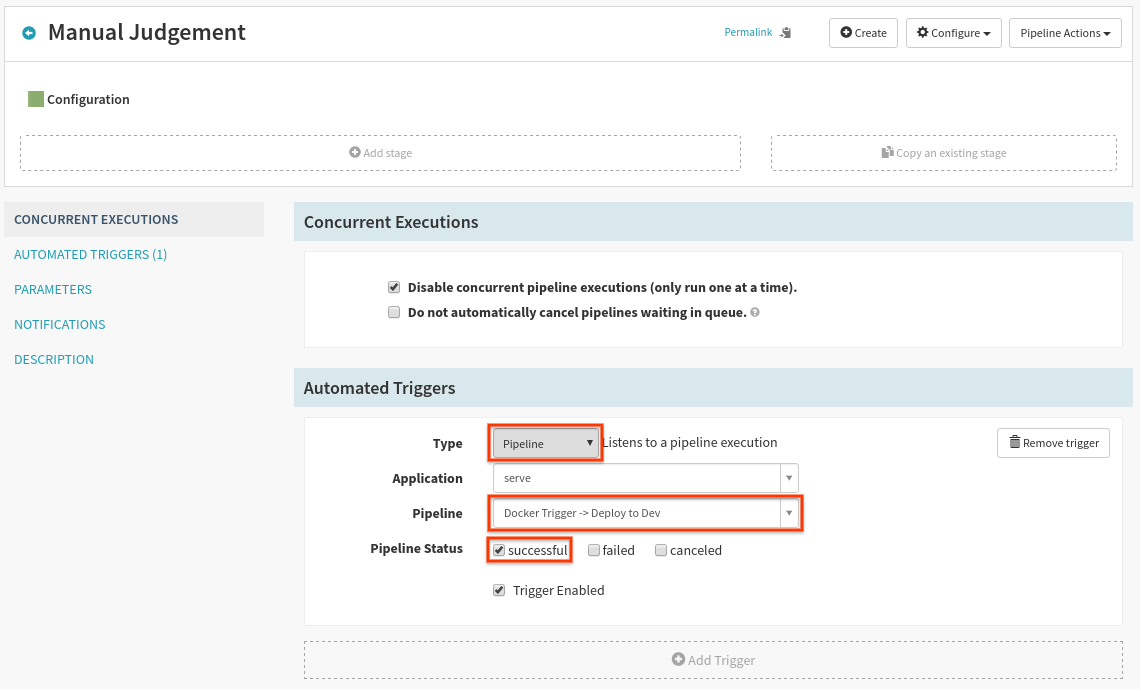
Back on the Pipelines dialog, create a new pipeline as before, but call it “Manual Judgement”. On the first screen, add a Pipeline trigger as shown below:
We will only add a single stage, which will serve to gate access to the prod environment down the line. The configuration is shown here:
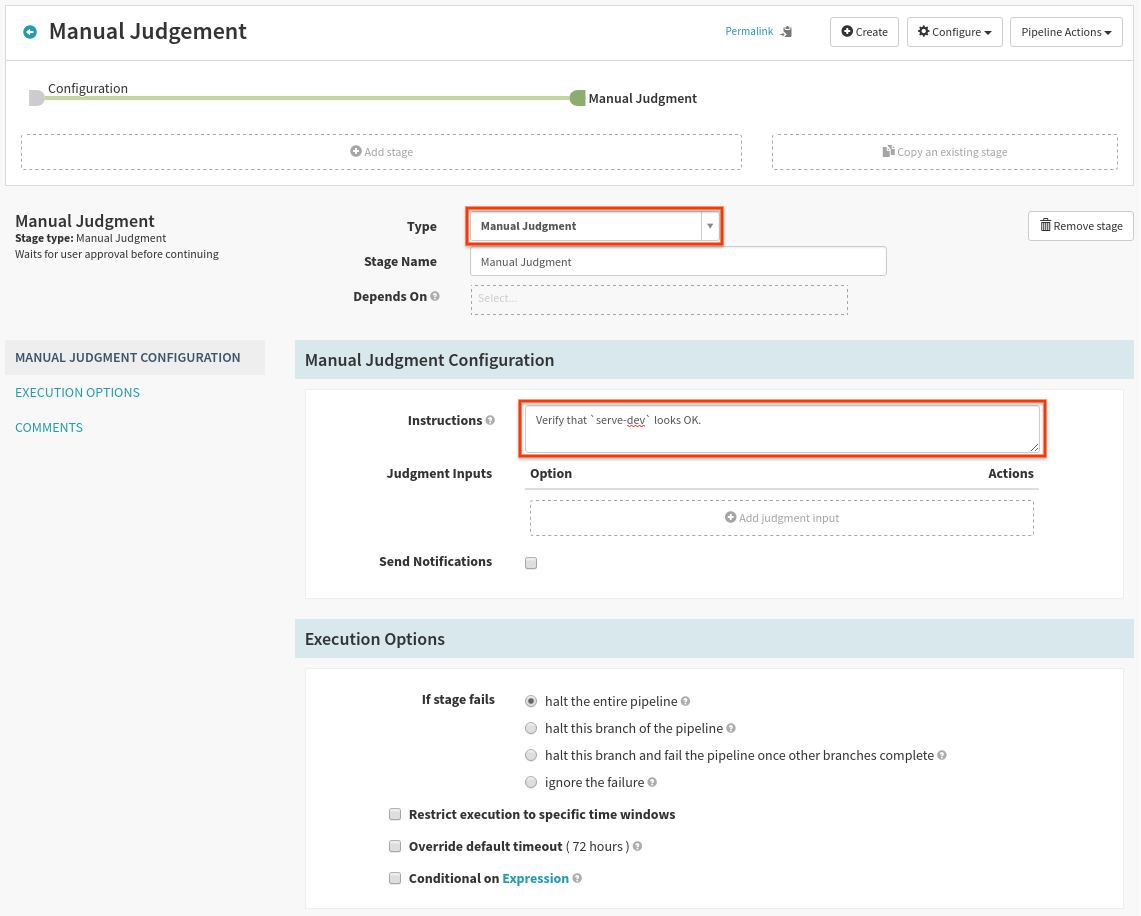
Keep in mind, more advanced types of verification can be done here, such as running a Kubernetes batch job to verify that your app is healthy, or calling out to an external Jenkins server. For the sake of simplicity we will keep this as “manual judgement”.
6. Promote to prod
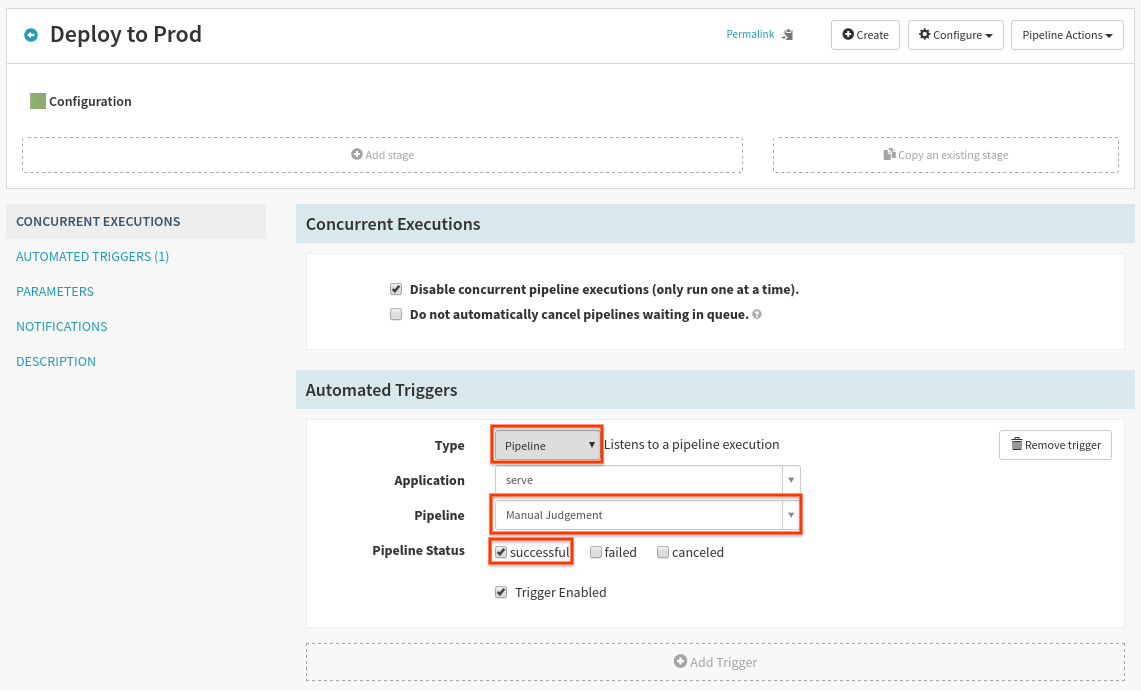
Create a new pipeline titled “Deploy to Prod”, and configure a pipeline trigger as shown here:
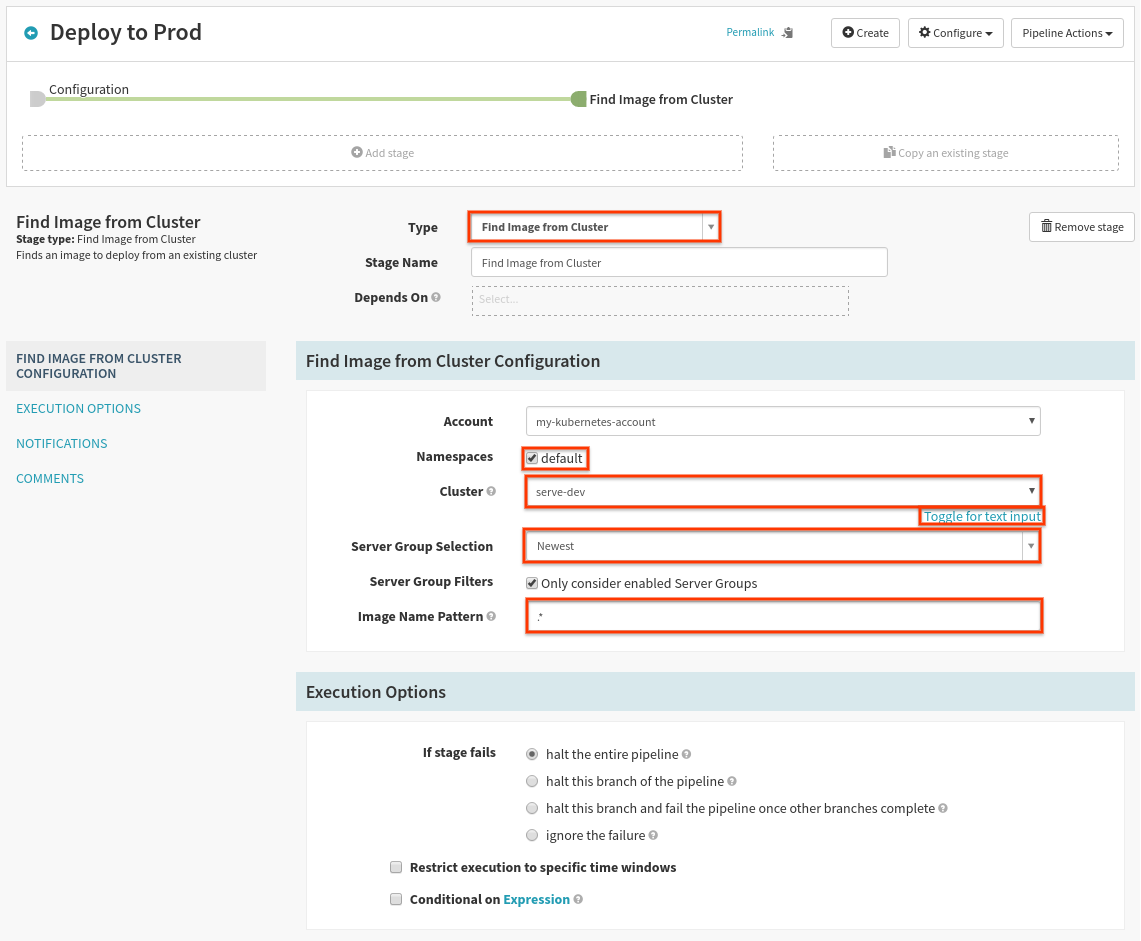
Now we need to find the deployed image in dev that we previously verified. Add a new stage and configure it as follows:
Select the “default” namespace, the “serve-dev” cluster using “Toggle for list of clusters”, and make sure to select “Newest” as the “Server Group Selection”.
“Image Name Pattern” can be used when multiple different images are deployed in a single Kubernetes Pod. Since we only have a single deployed container we can safely use ".*" as the pattern.
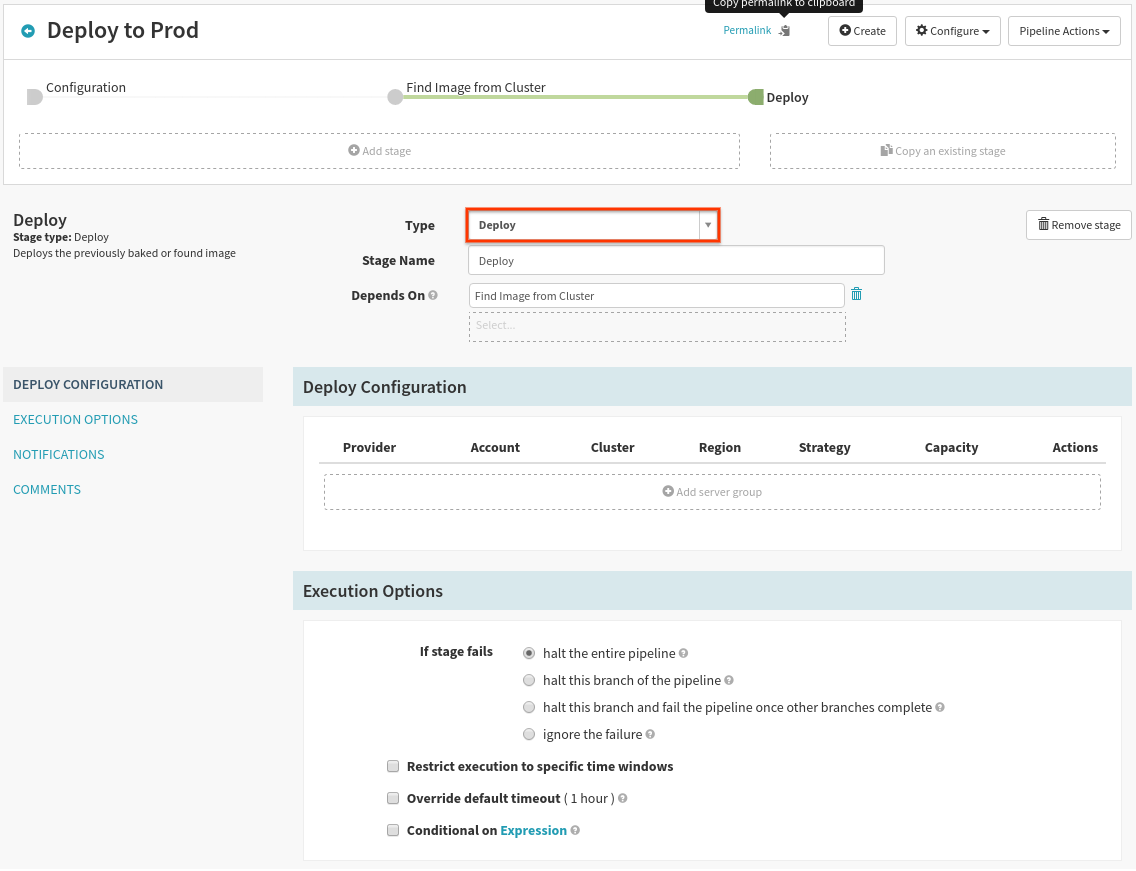
Now, to deploy that resolved image, add a new stage and configure it as follows:
Select Add Server Group, and again use the dev deployment as a template:
This time we need to make three changes to the template. First, change the “stack” to represent our prod cluster:
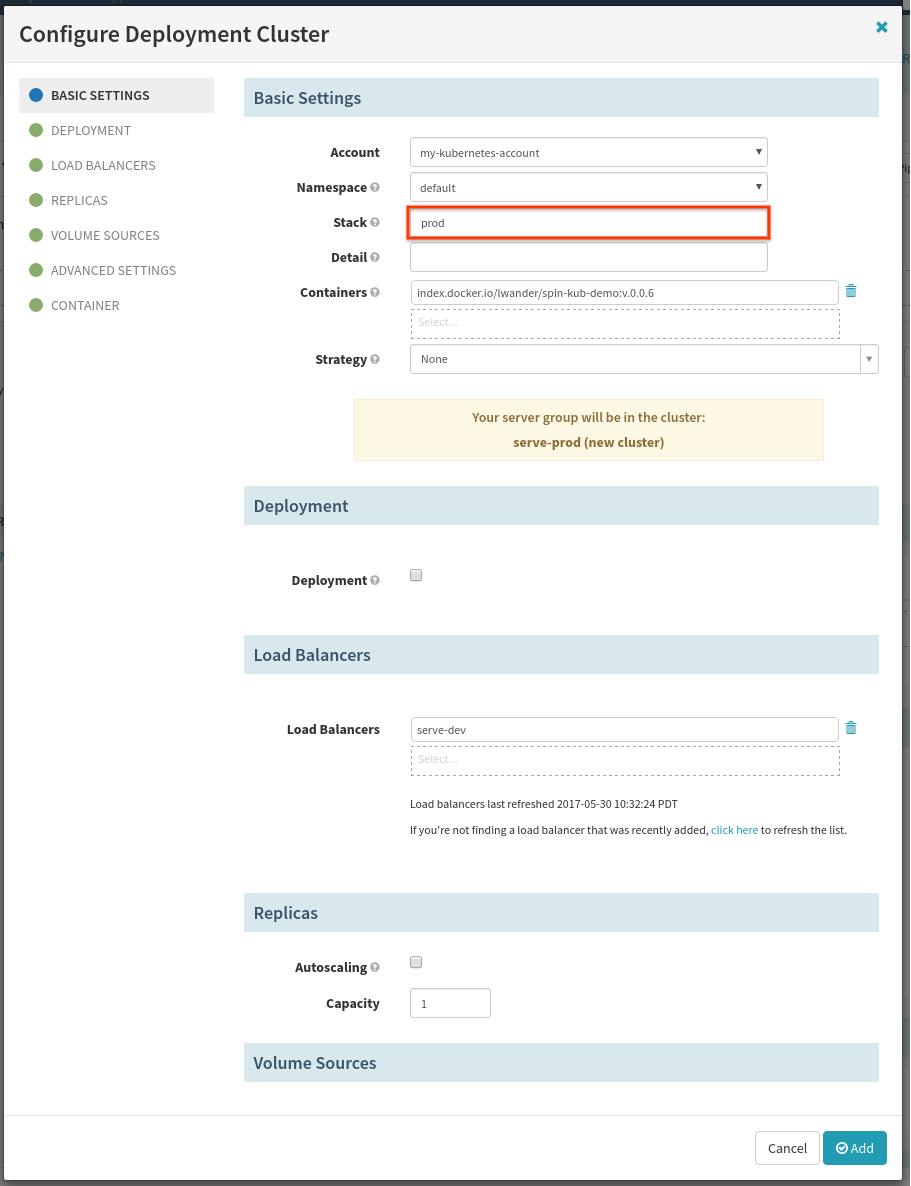
Next in the load balancers section:
We want to attach this server group to the “prod” load balancer, so make sure to remove the “dev” load balancer with the trash-can icon, and select the “serve-prod” load balancer in its place.
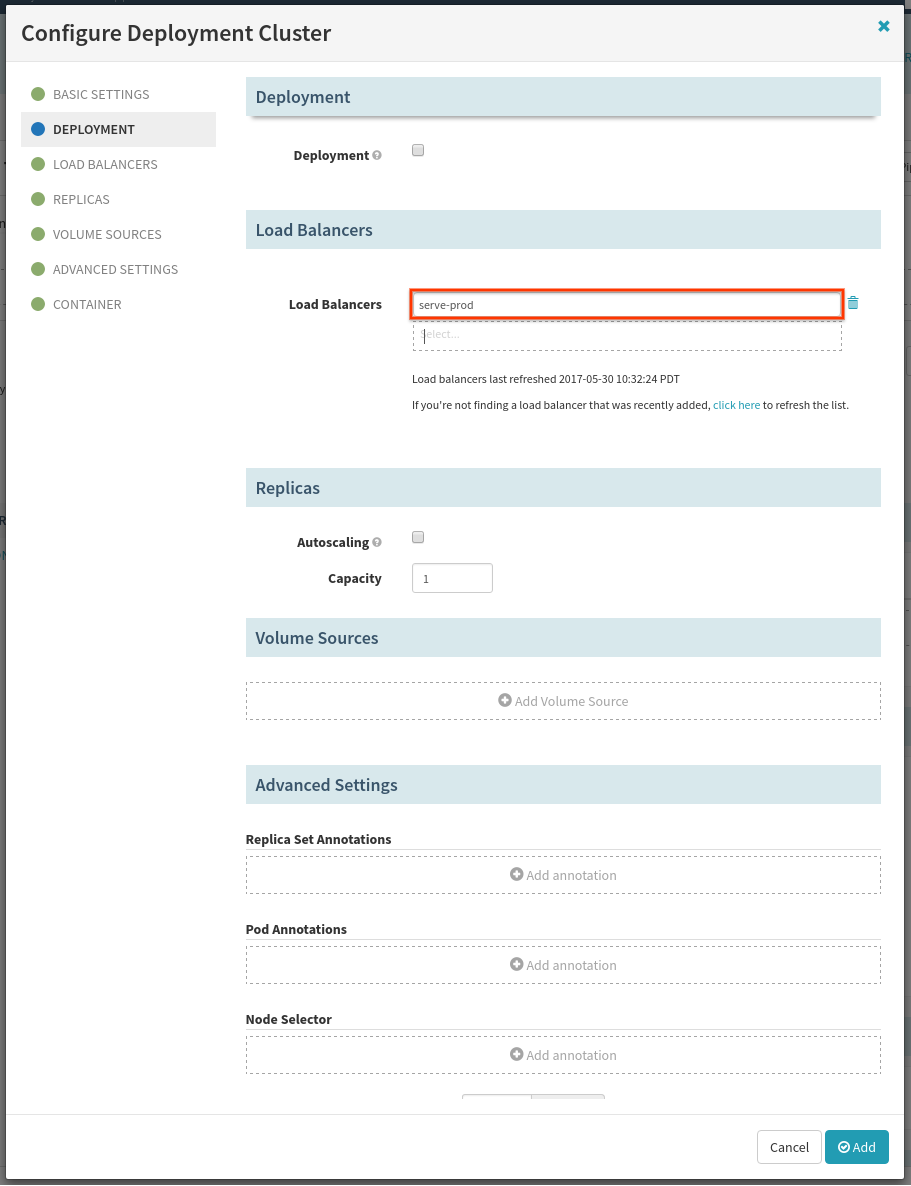
Lastly, in the container section, make sure that your image is set to the result
of the Find Image stage (serve-dev.*), rather than a specific image that you
have already deployed.
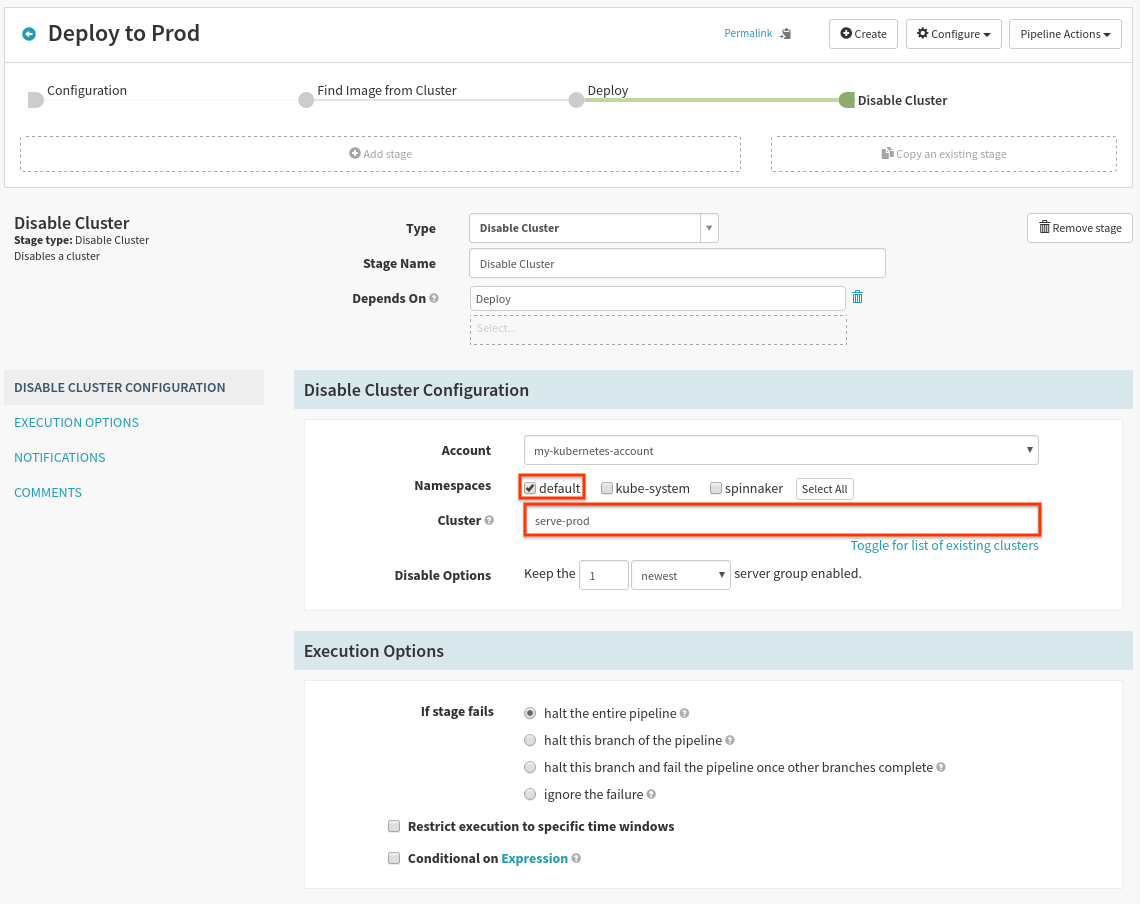
Now to prevent all prior versions of this app in production from serving traffic once the deploy finishes, we will add a “Disable Cluster” stage like so:
You will need to manualy enter “serve-prod” as the cluster name since it doesn’t exist yet.
Save the pipeline, and we are ready to go!
7. Run the pipeline
Push a new branch to your repo, and wait for the pipeline to run.
NEW_VERSION=v1.0.0
git checkout -b $NEW_VERSION
git push origin $NEW_VERSION
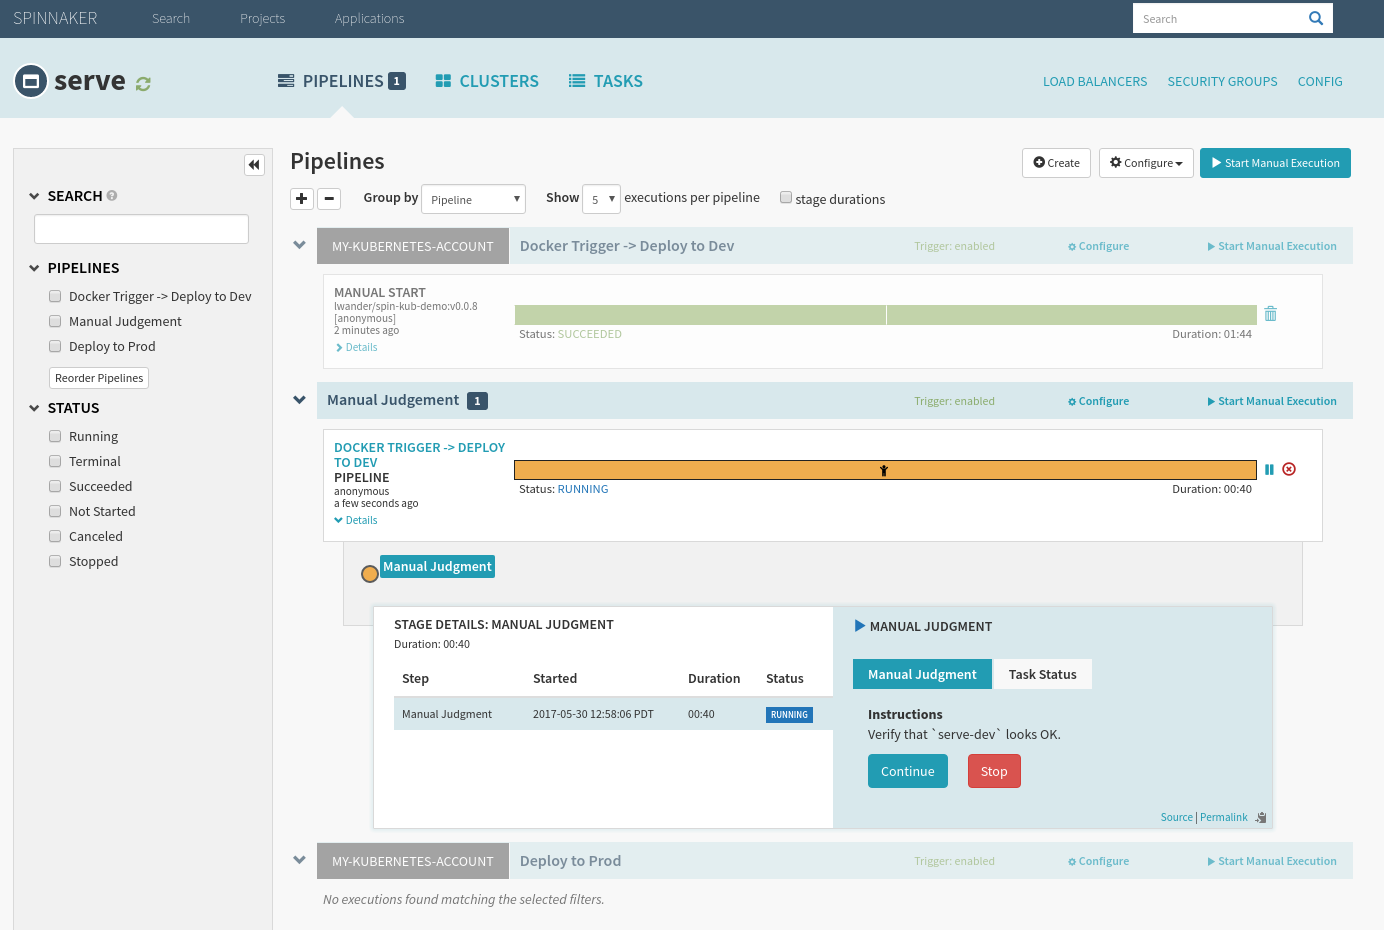
Once the Manual Judgement stage is hit, open serve-dev to “verify” your deployment, and hit continue once you are ready to promote to prod.
Selecting “stop” will cause the deployment to fail, and the next pipeline won’t trigger.
Notice that the “Find Image” phase automatically finds the tag that we triggered the first pipeline, as it was the one we verified earlier.
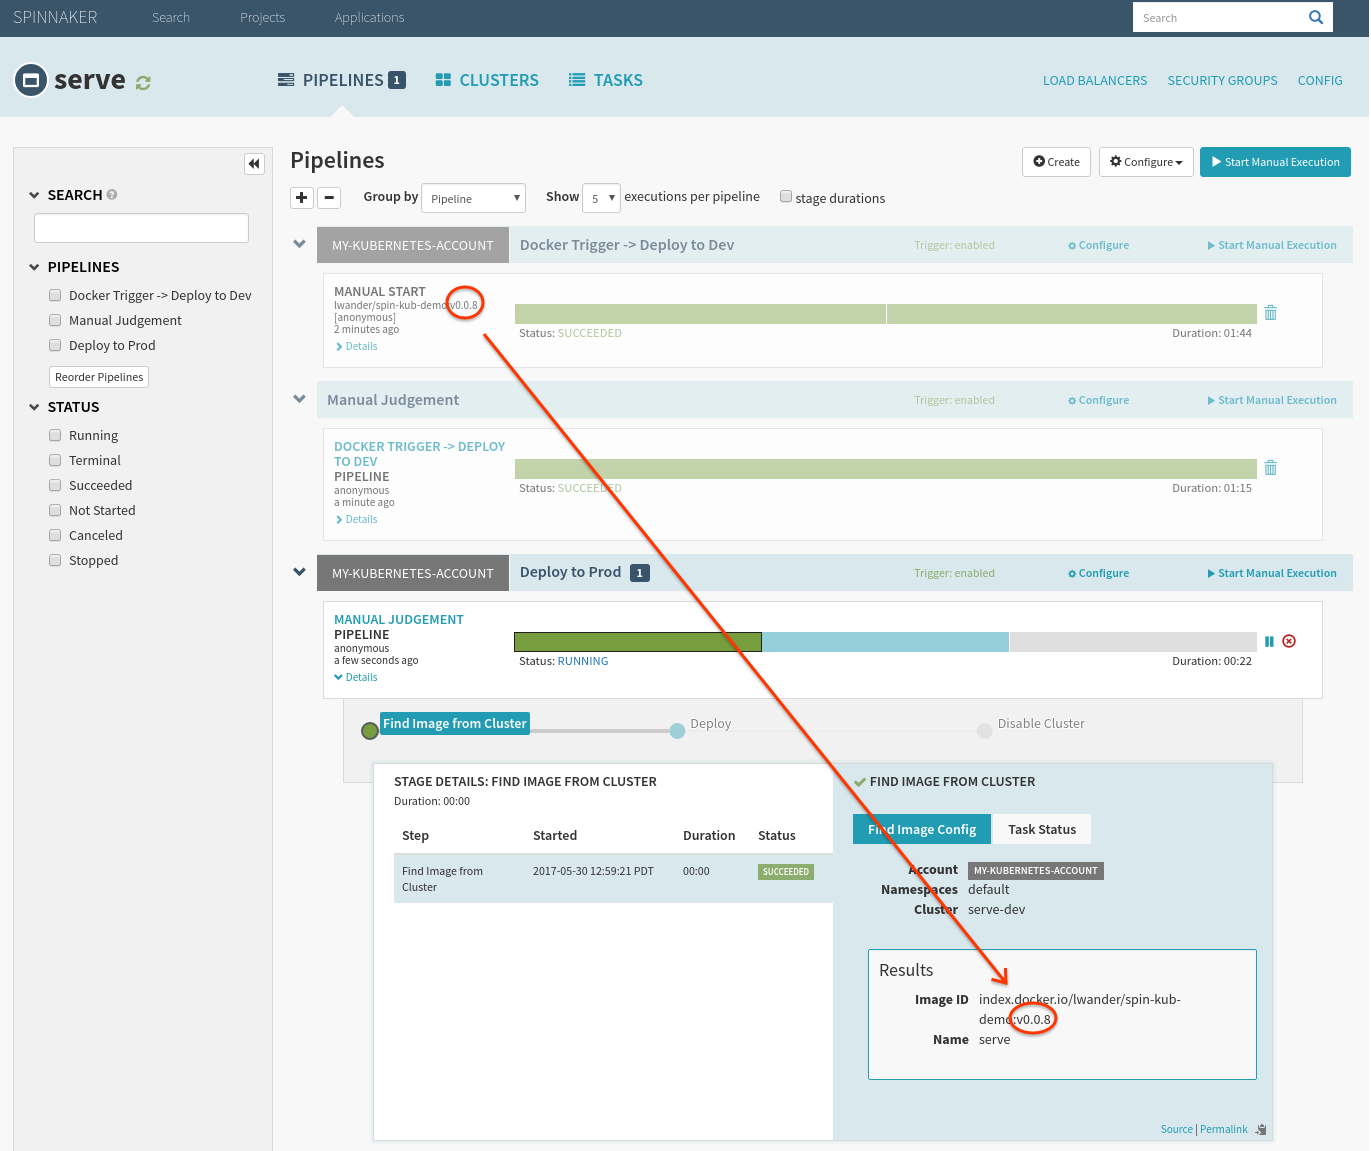
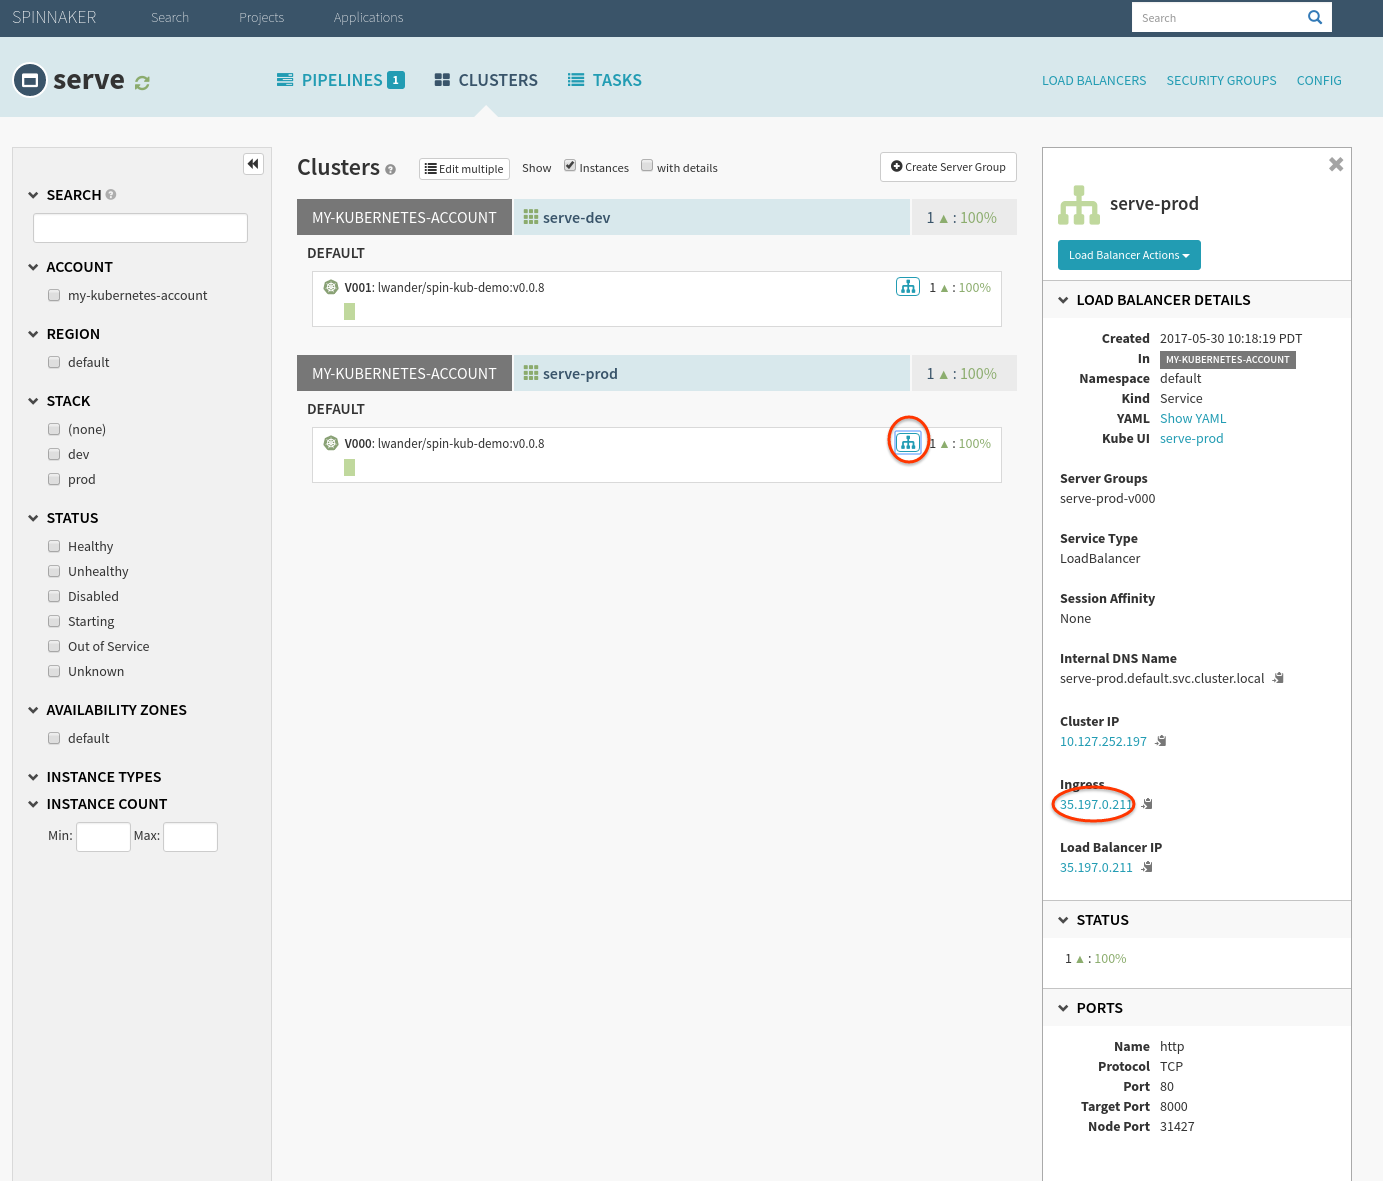
To verify, check the public facing cluster’s service’s endpoint circled above.