Amazon EC2
In AWS, an Account maps to a credential able to authenticate against a given AWS account.
Option-1 : Use AWS Console to configure AWS
Use this option to deploy Spinnaker, if you are familar with deployment using AWS Console .
Managing Account
- Navigate to Console > CloudFormation and select your preferred region.
-
Download the template locally to your workstation.
2.a (Optional). Add additional managed account as shown on line 158 in the SpinnakerAssumeRolePolicy section of the downloaded template file.
- Creating the CloudFormation Stack
- Create Stack > Upload a template to Amazon S3 > Browse to template you downloaded in Step-2 above > Next
- Enter Stack Name as spinnaker-managing-infrastructure-setup and follow the prompts on screen to create the stack
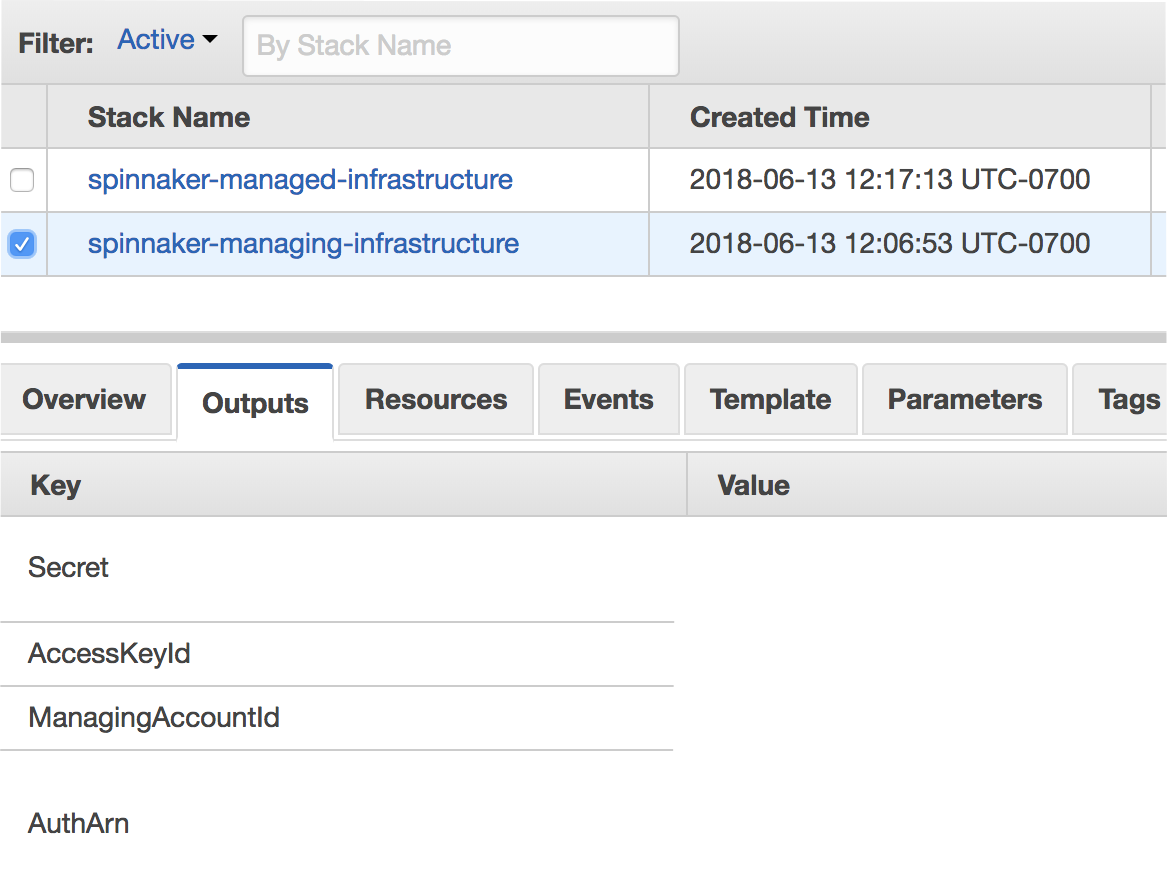
- Once the stack is select the stack you created in Step-3 > Outputs and note the values. You will need these values for subsequent configurations.
In each of the Managed Account
These steps need to be carried out for the managing account as well.
- Navigate to Console > CloudFormation and select your preferred region.
- Download the template locally to your workstation.
- Creating the CloudFormation Stack
- Create Stack > Upload a template to Amazon S3 > Browse to template you downloaded in Step-2 above > Next
- Enter Stack Name as spinnaker-managed-infrastructure-setup and follow the prompts on screen to create the stack
- Enter AuthArn and ManagingAccountId as the value noted above and follow the prompts on screen to create the stack
Option-2 : Use AWS CLI to configure AWS
This option assumes that you have AWS CLI installed , configured and have access to managing and each of the managed account.
Managing Account
If you want to use AccessKeys and Secrets to run Spinnaker
curl https://d3079gxvs8ayeg.cloudfront.net/templates/managing.yaml
echo "Optionally add Managing account to the file downloaded as shown on line 158 in the SpinnakerAssumeRolePolicy section of the downloaded file."
aws cloudformation deploy --stack-name spinnaker-managing-infrastructure-setup --template-file managing.yaml \
--parameter-overrides UseAccessKeyForAuthentication=true --capabilities CAPABILITY_NAMED_IAM --region us-west-2
If you want to use InstanceProfile run Spinnaker
curl https://d3079gxvs8ayeg.cloudfront.net/templates/managing.yaml
echo "Optionally add Managing account to the file downloaded as shown on line 158 in the SpinnakerAssumeRolePolicy section of the downloaded file."
aws cloudformation deploy --stack-name spinnaker-managing-infrastructure-setup --template-file managing.yaml \
--parameter-overrides UseAccessKeyForAuthentication=false --capabilities CAPABILITY_NAMED_IAM --region us-west-2
In each of the Managed Account
These steps need to be carried out for the managing account as well.
curl https://d3079gxvs8ayeg.cloudfront.net/templates/managed.yaml
aws cloudformation deploy --stack-name spinnaker-managed-infrastructure-setup --template-file managed.yaml \
--parameter-overrides AuthArn=FROM_ABOVE ManagingAccountId=FROM_ABOVE --capabilities CAPABILITY_NAMED_IAM --region us-west-2
Configure Halyard to use AccessKeys (if configured)
These steps need to be carried out only if you selected UseAccessKeyForAuthentication as true in Option-1 or Option-2 above
hal config provider aws edit --access-key-id ${ACCESS_KEY_ID} \
    --secret-access-key # do not supply the key here, you will be prompted
Configure Halyard to add AWS Accounts
$AWS_ACCOUNT_NAME={name for AWS account in Spinnaker, e.g. my-aws-account}

hal config provider aws account add $AWS_ACCOUNT_NAME \
    --account-id ${ACCOUNT_ID} \
    --assume-role role/spinnakerManaged
Now enable AWS
hal config provider aws enable
Advanced account settings
You can view the available configuration flags for AWS within the Halyard reference.
Next steps
Optionally, you can set up Amazon’s Elastic Container Service or set up another cloud provider, but otherwise you’re ready to choose an environment in which to install Spinnaker.